Jekyll2026-07-24T00:40:51+00:00https://www.maiakanegae.com/feed.xmlMaia KanegaeSoftware Engineer | London, UK | B.Sc. Computer Science @ ICMC/USP, BrazilAdvent of Code 2020 in Review2020-12-25T00:00:00+00:002020-12-25T00:00:00+00:00https://www.maiakanegae.com/advent-of-code-2020-in-review
Happy Holidays! Here I am at the end of another year, having just finished Advent of Code 2020! If you are new to it, it’s an Advent calendar full of programming puzzles from December 1st all the way to Christmas, made by the amazing Eric Wastl every year since 2015.
I’ve been participating since 2018 - here’s my comments on last year’s edition -, and this time I actually tried my best to get some sweet leaderboard points! You can check my Python 3 solutions on my GitHub, and you can also keep reading for more info and my comments on the event.
Once again, the event consists of 50 great programming puzzles, which also award internet points and clout for the first 100 people who complete each of them the fastest - again, as a reminder, it’s only a competition if you want it to be. This year’s storyline was about you, the Christmas savior for 5 years in a row, finally taking a break, vacationing on a chill tropical island.
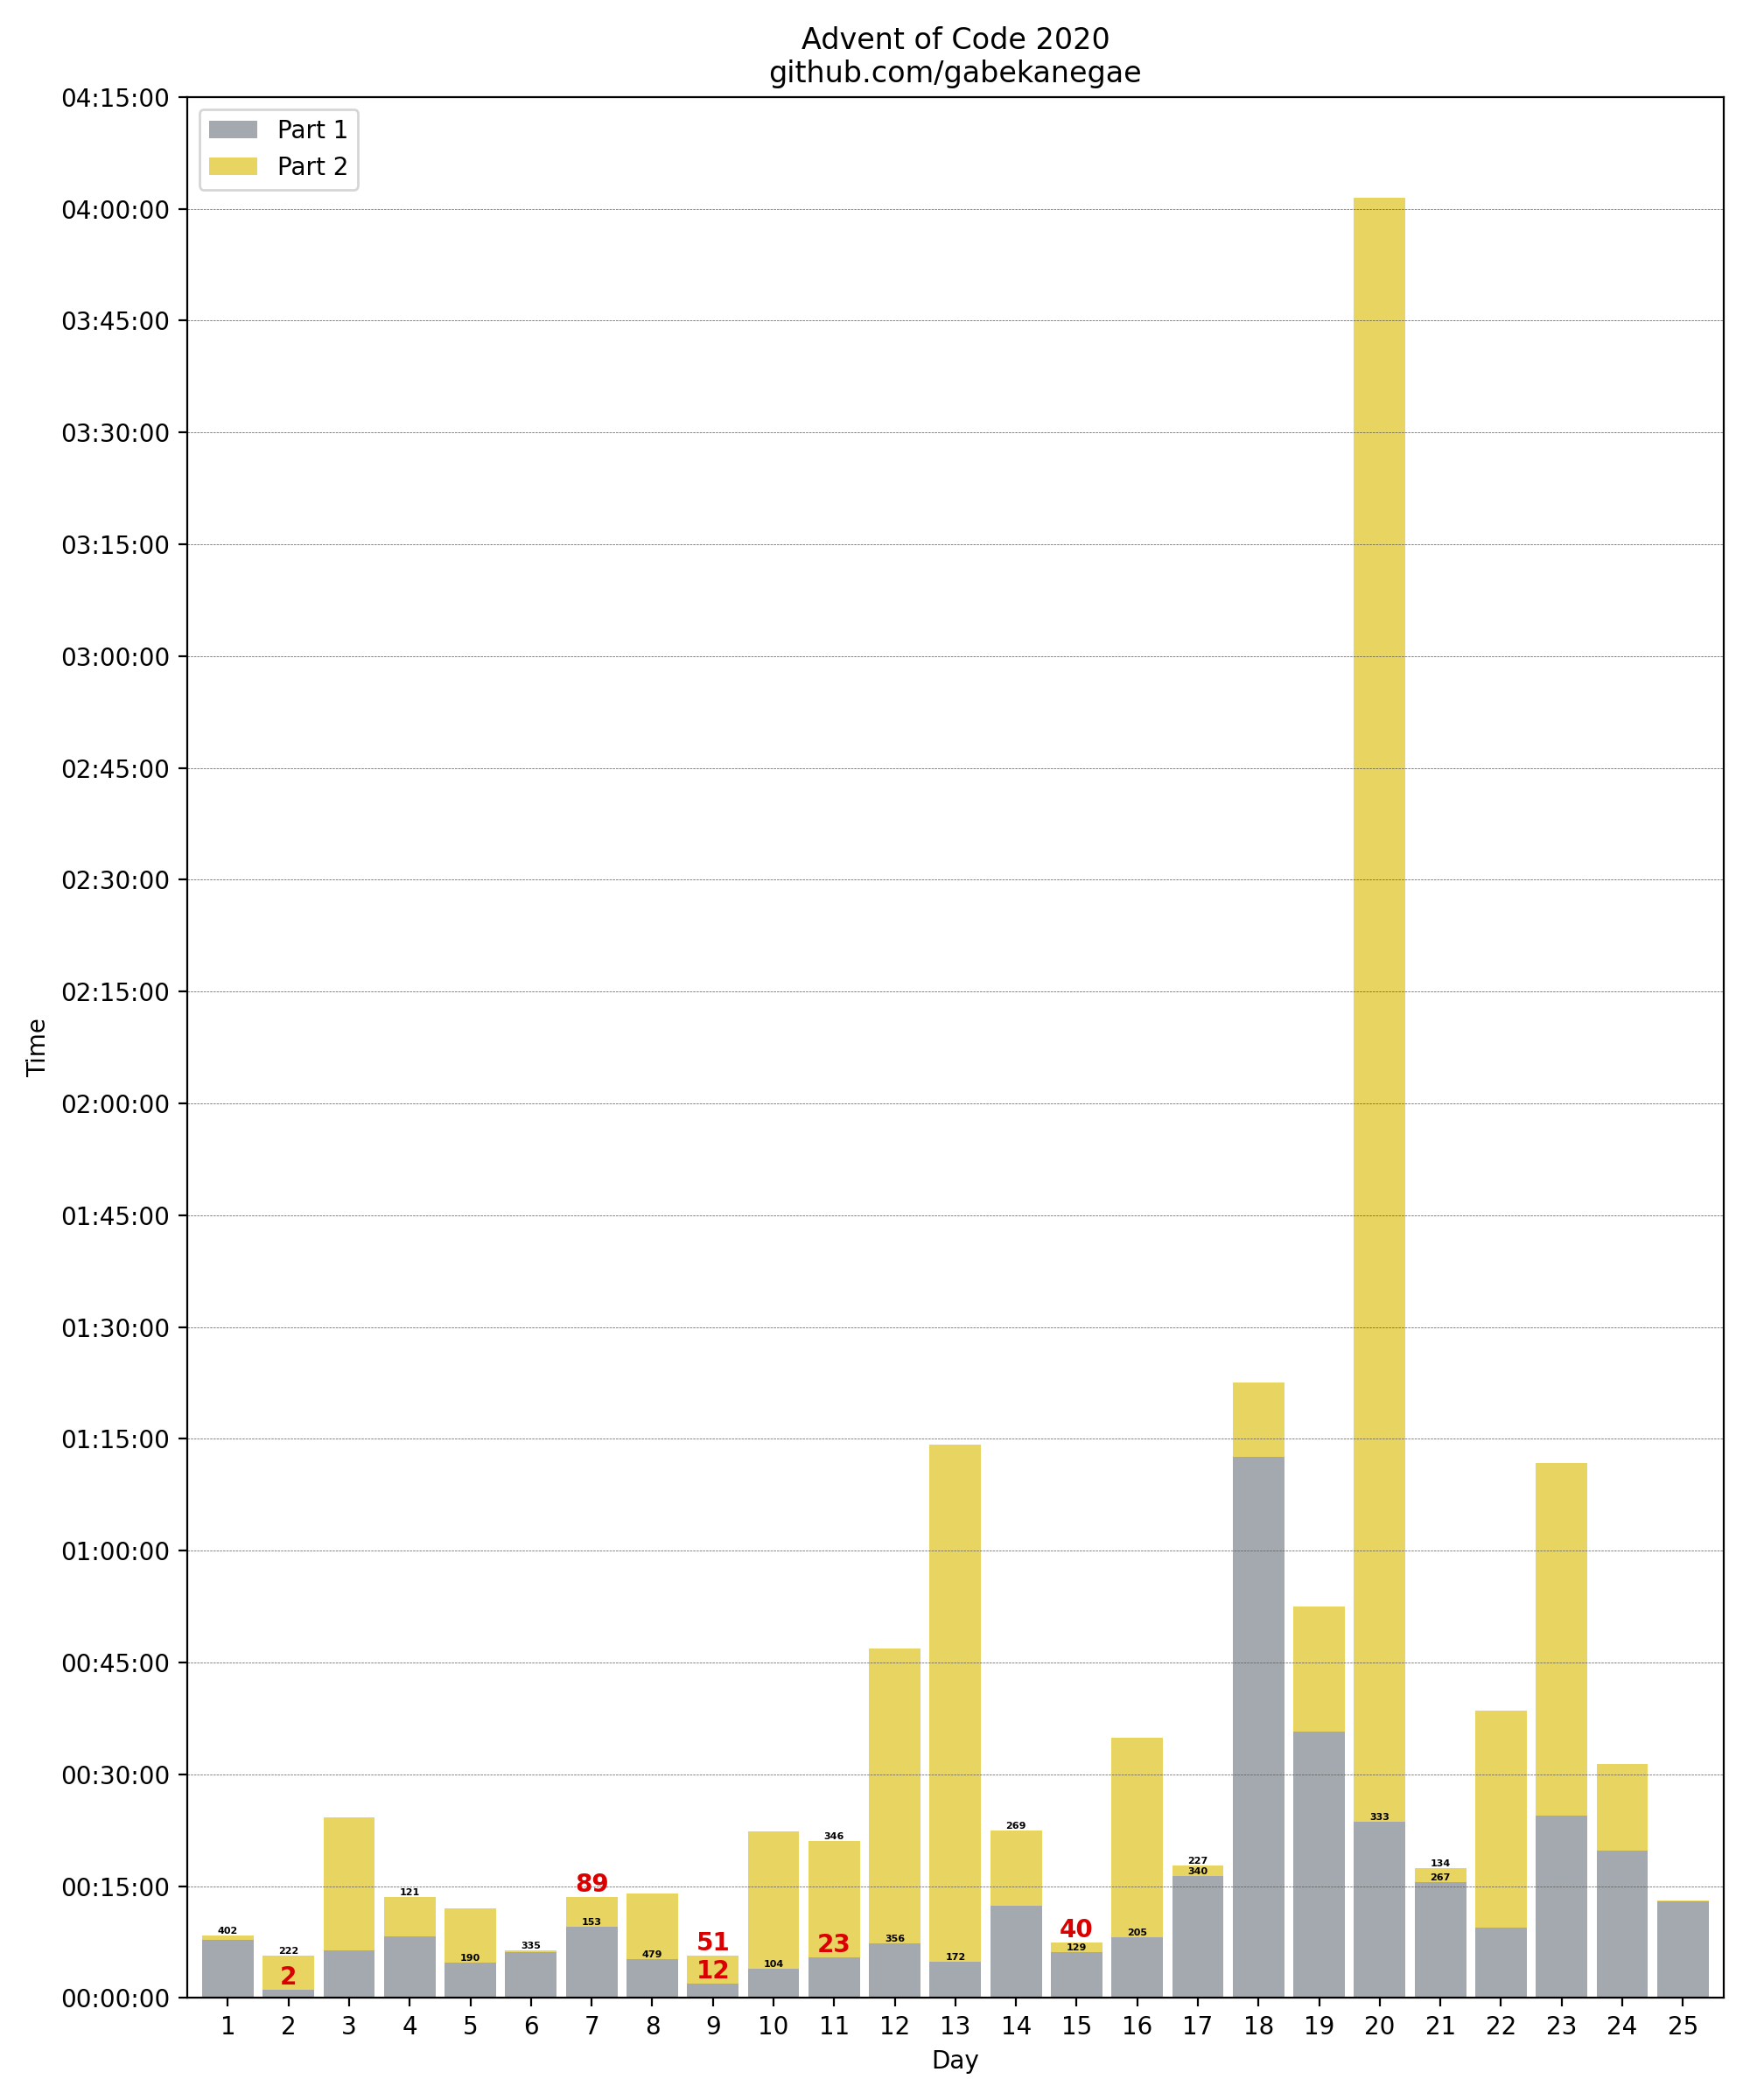
As puzzles release at midnight EST/UTC-5, or 2AM my time, it’s often hard to be awake and ready to compete for leaderboard points. However, this year I did manage to be present for all puzzle release times, completing all of them in the following minutes/hours - which I consider a big personal accomplishment by itself. More than that, I also scored a total of 389 points over 6 leaderboard spots, placing me at 167th on the Global Leaderboard, topping last year’s score of 351 points at 196th place! Outside of the strict top 100, I managed to complete 25 of the puzzles - exactly half of them - in the top 500! It’s fair to note that this year had way more people participating, so the leaderboard competition was far fiercer! If, in the future, you do feel like going down this route, I very much recommend betaveros’, this year’s #1, blog post on How to Leaderboard.
With all of those personal achievements in mind, I figured I would play a bit with some Matplotlib, and plotted a graph of my completion times and leaderboard positions! Top 100s are marked in red, and top 500s are in black.Here’s the code that I wrote to generate it.
Finally, a big thank you to all of the friends I managed to convince - or coerce - to join me on this month-long adventure, and a special shout out for those who were there with me over Discord every day at 2AM! Sharing strategies, solutions, celebrating leaderboard positions and just being together for some coding fun early in the morning was my highlight of this year’s event.
Day 6: Out of all the days in which rookie mistakes cost me leaderboard spots, this one was the most impressive: I managed to completely misread the prompt and solved Part 2 before Part 1. Hooray?
Day 7: Recursion is fun! Great basic intro/refresher on the topic.
Day 10: Dynamic programming is… eh. Not that much well versed in it, so Part 2 took me a while. Shame on me, though, as this day’s puzzle was a simple variation of the classic Climbing Stairs problem.
Day 12: It took me so, so long to figure out the simple linear algebra to rotate the points around the origin. Lesson learned, definitely won’t forget that any time soon!
Day 13: Although very far from the nightmare that was last year’s Day 22, this was 2020’s Great Discrete Mathematics day. I quickly realized it had to be related to modular inverses and that something was up with all bus IDs being prime, but connecting the dots to arrive on the Chinese Remainder Theorem took an hour and change. Well needed refresher on Discrete Maths, once again!
Day 19: All those Formal Languages classes came through! Great twist on Part 2 as well, making it a CFG and requiring an actual understanding of the rules. However, for both parts I considered that building the regular expression from the language rules was challenging enough so I left it at that, and broke my sacred rule of avoiding RegEx on AoC at all costs. Will definitely come back later and implement the actual language parsing.
Day 20: Oof. This one threw my sleep schedule completely over the window, as I spent 4 hours just to complete it plus another 3 to tidy up my code, and by that point it was already 9AM. But oh boy was it fun. Without a doubt my favorite of this year, implementing a jigsaw solver has been on my bucket list for years now, and the brain-teasing while doing it was simply amazing. I do want to shine some light on paiv’s interactive version as a fantastic tool to play around with, understand the puzzle itself or explain it to other people.
Day 23: At first I got spooked at the thought of it being another Discrete Maths one. After being stumped for a good hour or so, I had to grab a tip from the Advent of Code’s subreddit, and learned about the idea of combining a linked list and a hash map to fulfill the puzzle’s requirement of accessing arbitrary nodes in constant time. Cool!
Day 24: A fun twist on cellular automata, this time using a hexagonal grid. Luckily, I quickly realized I had done something like this before, on Day 11 of AoC 2017! Here’s an amazing blog post from Red Blob Games on hexagonal grids, which I used as a basis for both 2017’s edition and this one. If that piqued your interest, do check out their other posts, as they are all full of mindblowing insights!
]]>Reverse engineering Lunia, my childhood MMORPG2020-09-18T00:00:00+00:002020-09-18T00:00:00+00:00https://www.maiakanegae.com/reverse-engineering-lunia
Lunia was an MMORPG by South Korean producer allm, originally launched in early 2006 and published in Brazil by Level Up! Games in late 2008. Its main premise was being an MMORPG with heavy elements of an arcade beat ‘em up, being one of the first to combine both genres.
I started playing Lunia sometime in 2009, and it was what taught me fast typing, introduced me to online forums and communities, and gracefully presented me the world of MMOs in general. The game was the biggest time-sink of young me until late 2012, when the Brazilian servers shut down. Sadly, the global servers followed suit just a year after. It’s fair to say it was far from being the largest MMO at the time, but to 9-year-old me, it was golden.
Recently, I stumbled upon some screenshots buried deep in my file archives. After a couple days of reminiscing old times in some unofficial servers that are still around - and realizing the game aged surprisingly well (although it might be just my nostalgia talking) - I decided to use the skills that I acquired since then to snoop around the game files, maybe learning some cool stuff along the way. As it turns out, that was quite successful and exceedingly fun, so here’s a quite lengthy rundown of my journey.
I probably spent over 150 hours in the last month to get up to this point, and it is still very much a work in progress. Many of the game files are still hidden or unexplored, and there’s a bunch that I still plan to do with the extracted assets. With that, I may update this post (or write follow-ups) in the near future if I do so.
0. Disclaimers
First of all, I am aware that the legality of this is a gray area. Although I’m pretty sure at this point Lunia could be categorized as abandonware, I still don’t think sharing the game files are, legally speaking, a very good idea, so I won’t be releasing the decoded stuff here other than small snippets or screenshots. Still, if you want to try it yourself, all of the base files are somewhat easy to find if you know where to look for.
Secondly, most of this exploration was far out of my comfort zone. Other than a bunch of practice with Python scripts, I had barely any experience with most of the tech and strategies used here. Despite Computer Graphics being a field that I have always been very interested in, I had never touched 3D modeling, 3D animation, shaders and the like before this. Furthermore, my experience with reverse engineering in general is very, very brief, and game development was also never my thing, although I tried my hand at it a couple of times in the last years. Because of that, do take all of this with a big grain of salt: I’m sure there are many inaccuracies and false assumptions below. This was a great learning project starting from very little previous experience, so please do get in touch if you find anything out of place.
Based on both points above, this is not supposed to be a guide. This is more of a writeup from my exploration and storytelling of my discoveries. Although it’s not a tutorial, it probably serves as one if you ignore all my rambling. Also, I had no set goal at any stage whatsoever: I just kept taking whatever path I felt like and doing whatever I was up to at the time, so that’s why my steps may feel unordered and out of place.
Additionally, this is not an incentive or recommendation for you to play on an unofficial server. I won’t be giving any pointers on how to access them, but, again, the information is easily available online if you search for it. However, as Lunia is still “active”, from now on I will be talking about it in the present tense. Do be aware that, officially, the game servers - and, being an MMO, the game itself - are unavailable.
Finally, all of this was done solely for educational purposes. There is absolutely no intention of breaking copyright or redistributing any proprietary files, nor disrupting any active services. This is a writeup of a technical exploration fueled by curiosity, passion and nostalgia.
1. What is Lunia?
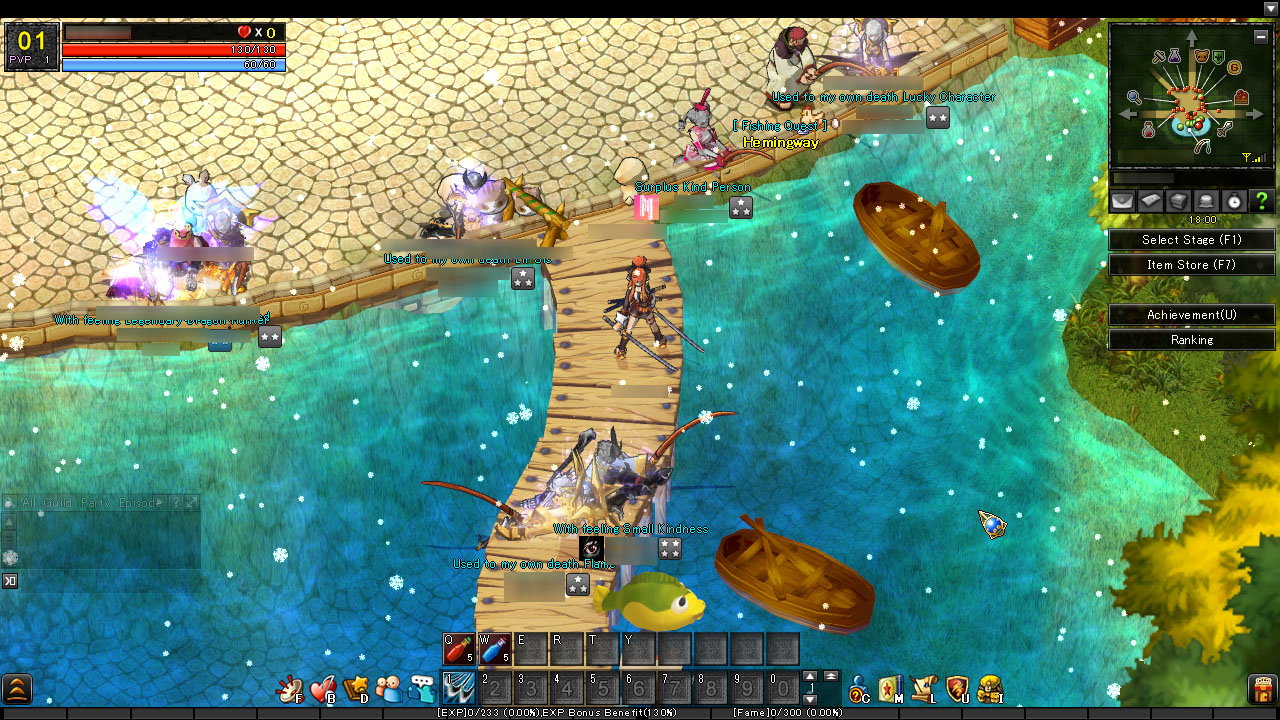
Lunia, originally called “Lunia: Record of Lunia War”, and in a later update renamed to “Lunia Z”, is an MMORPG with a big focus on PvE content, individual instanced stages and a rather linear progression - far from the open-world, quest-driven MMOs that dominate the market today. It consists of around 150 maps, or “stages”, of increasing difficulty, leveling your character from level 1 to 99. You can also be “reborn” once a month, as many times as you like: doing so resets your character back to level 1, giving you some cool stats bonuses and cosmetic wings in return, stacking up every time you rebirth. Most of the stages can be played with a party of up to 5 people, with a maximum party size of 12 for special maps or events. Lunia also has microtransactions, which definitely gives the game some “pay-to-win” vibes.
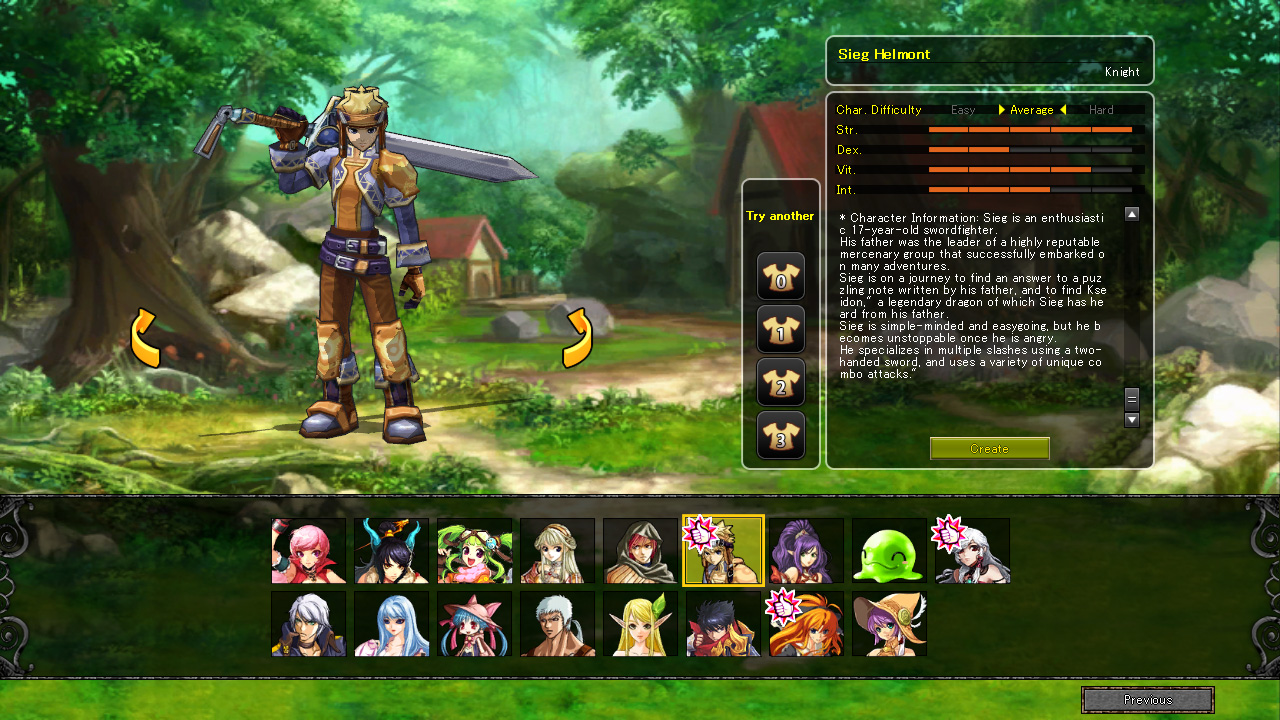
Instead of creating and customizing your character like you would in most MMOs nowadays, you choose from 17 characters (originally just 3, with 14 more added to the roster via updates through the years), each having a well-defined place in Rodesia, the continent where Lunia takes place. Here’s the character creation screen:
Just so you can follow along when I use any game-specific terms, here’s a brief description of the main stages and collections of them:
Town Square: Main game hub, where most shops are located and players idle while fishing or selling stuff (more on this below).
History (Level 1-70): The game launched with only 3 episodes of 10 stages each, consisting of the main storyline. Later, it was gradually expanded to 7 episodes.
Legend (Level 30-70): Legend has the same first 6 episodes from History, with increased difficulty.
Bonus (Level 65+): Consists of 3 episodes with 7, 7, and 3 stages each, respectively. Longer levels with a big difficulty spike, hard to clear them by yourself. Gives some quite cool items and item sets. Each episode has a different theme and storyline.
Myth (Level 70+): Unlocks only after a rebirth. Has 6 stages and a somewhat long questline to unlock each of them. Gives exclusive item sets that can only be used in Myth/Devildom stages. Group content, not intended to be solo’d.
Devildom (Level 80+): Introduced very late into the game’s life, also requires a rebirth, and… I don’t know or remember that much, actually. Never reached that when I was little, and didn’t bother to play that much in unofficial servers.
Some other relevant (and fun!) game mechanics were:
Trading, Personal Shops, and Open Market: Trade items and currency with other players directly, set up your shop at the Square while idle, or put your items up for sale in the Open Market for anyone to purchase at any time.
Player vs. Player: A dozen or so PvP arenas for up to 8-vs-8 combat.
Guilds: Communities of up to 200 players, with extra perks when playing together.
Families: Essentially smaller guilds of up to 5 people, originally made to pair new players with experienced ones.
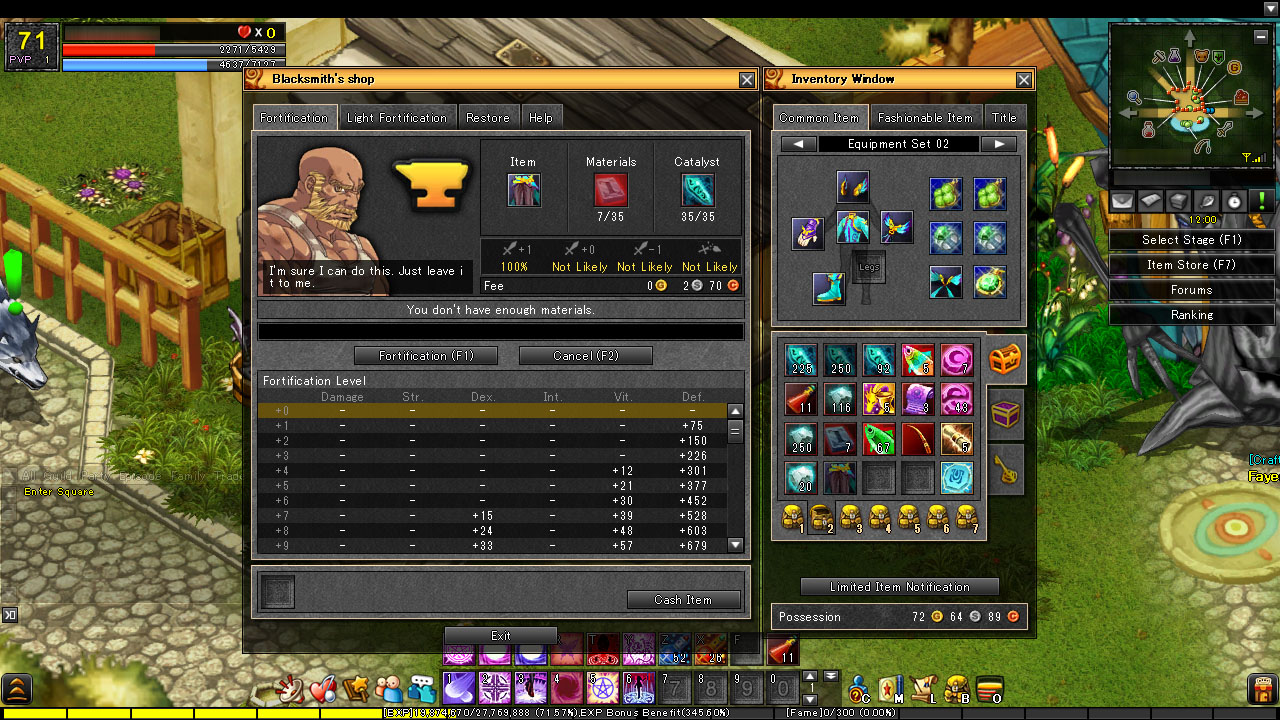
Item “fortification” and “light fortification”: Improve your items by spending reagents, heavily based on RNG. The latter would also make your equipment shinier.
Fishing: Leave your character fishing while idle to turn bait into various types of fishes, which can be sold for gold or traded with NPCs for many valuable items and resources.
Pets: Choose between dogs, cats, fairies, dragons, unicorns, and a dozen other small creatures that follow you around and give you stat bonuses - but only if you feed them.
Slime Racing: Bet coins on a fully RNG-based NPC race. Basically a Roulette numbered from 1 to 9.
Achievements: Complete various milestones and rack up achievement points, which in turn gives you some colored stars after your name for clout.
While looking for some information about Lunia (which the internet has surprisingly little of), I found two series of articles by IGN from 2007, sometime around the North America open beta launch, talking about the game’s initial premise and development, and they’re quite detailed. Here’s Record of Lunia War Interview Part 1 and Part 2, as well as Record of Lunia War Diary #1, #2, #3 and #4, both of which were a great read before cracking the game open.
2. Scratching the Surface
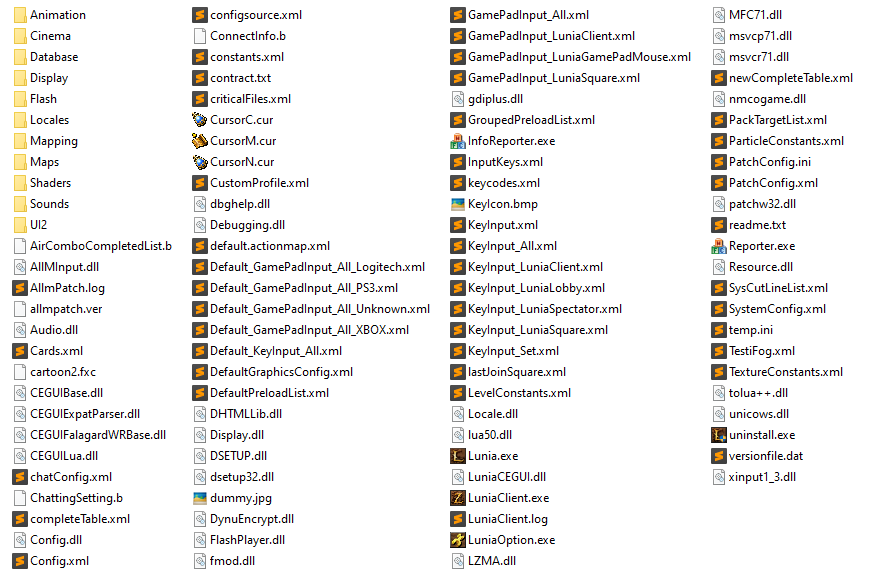
Initially, what I had to play around with were the game client files. I managed to get my hands in two clients from different unofficial servers, as well as the original one from the old days of the Brazilian server. I later found out that there were no big differences between the three of them other than the localization, so from now on, I’ll be referring to all of them as a single client. Here’s the game root directory, with a total size of around 1.5GB:
Together with the obvious game executables and cursor icons, most of the files at the root were configuration files. Key bindings, player preferences and graphics options, all stored in .xml text files with a bunch of comments in Korean. A few .dlls that grabbed my attention were FlashPlayer.dll, lua50.dll and tolua++.dll, LZMA.dll, and half a dozen with “CEGUI” in the filename.
The Cinema/ and Flash/ directories contained hundreds of .swf files that can be viewed with something like SWF File Player. Those are all Flash animations that are extensively used throughout the game. Alongside some of them, there were also a few sprites in the .dds format. Sounds/ had a hundred .ogg and .wav sound files, which were the game’s main theme songs, a bunch of background music and general ambience SFX. It also contained files Sounds.cfp and Sounds.cpv, extensions that I had never seen before.
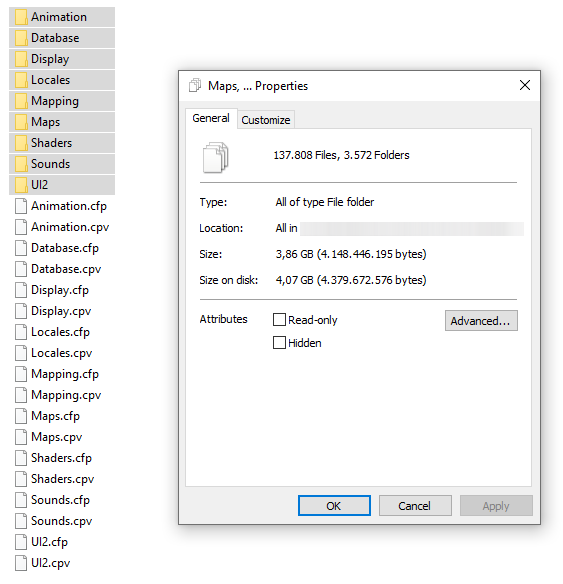
All the other folders (Animation/, Database/, Display/, Locales/, Mapping/, Maps/, Shaders/ and UI2/) had only two files in each of them: a .cfp and .cpv, named the same as each of their respective parent directories, exactly like the ones at Sounds/.
When trying to figure out what those two file types were, no obvious result showed up. Only when searching for the extensions together with “Lunia”, I managed to find some forums posts that guided me to QuickBMS, which has a handy unpack script for .cfp files, seemingly Lunia-exclusive. Upon inspecting the script, the file type is a simple binary file with a bunch of string filenames and its LZMA-compressed binary data (hence the LZMA.dll found earlier!) concatenated. As for their .cpv counterpart, they went completely unused by the script without any data missing as a result. By looking at its binary data, my best guess is that they simply serve as index tables for the game to be able to directly locate any specific file inside the archive. When extracted, the 1.2GB collection of 9 pairs of .cfp and .cpv files turned into over 130.000 files, totaling around 4GB:
There we go! Here are the interesting pieces that were unlocked by simply extracting the archives:
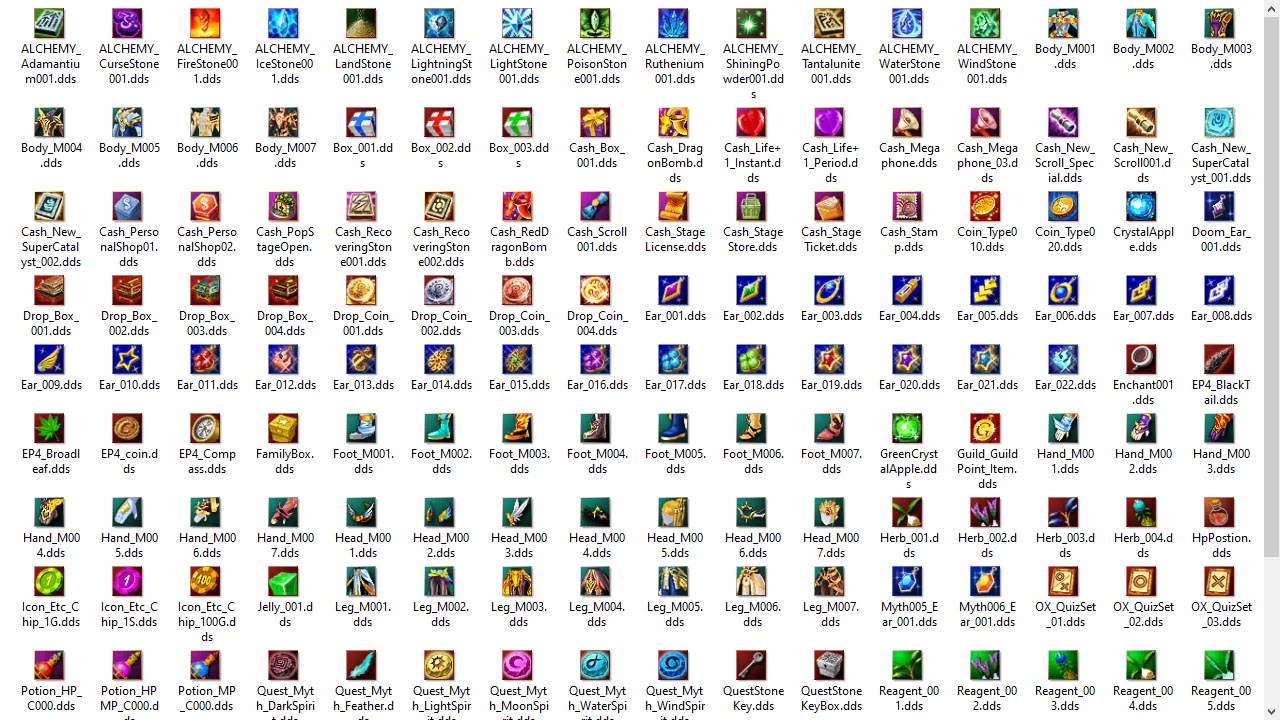
Over 25.000 item and skill icons at Display/Textures/, all in .dds format (screenshot below).
All game strings at Locales/, in more weirdly ancient .xml text files. Quest texts, NPC phrases, item and skill names/descriptions, achievements and everything else.
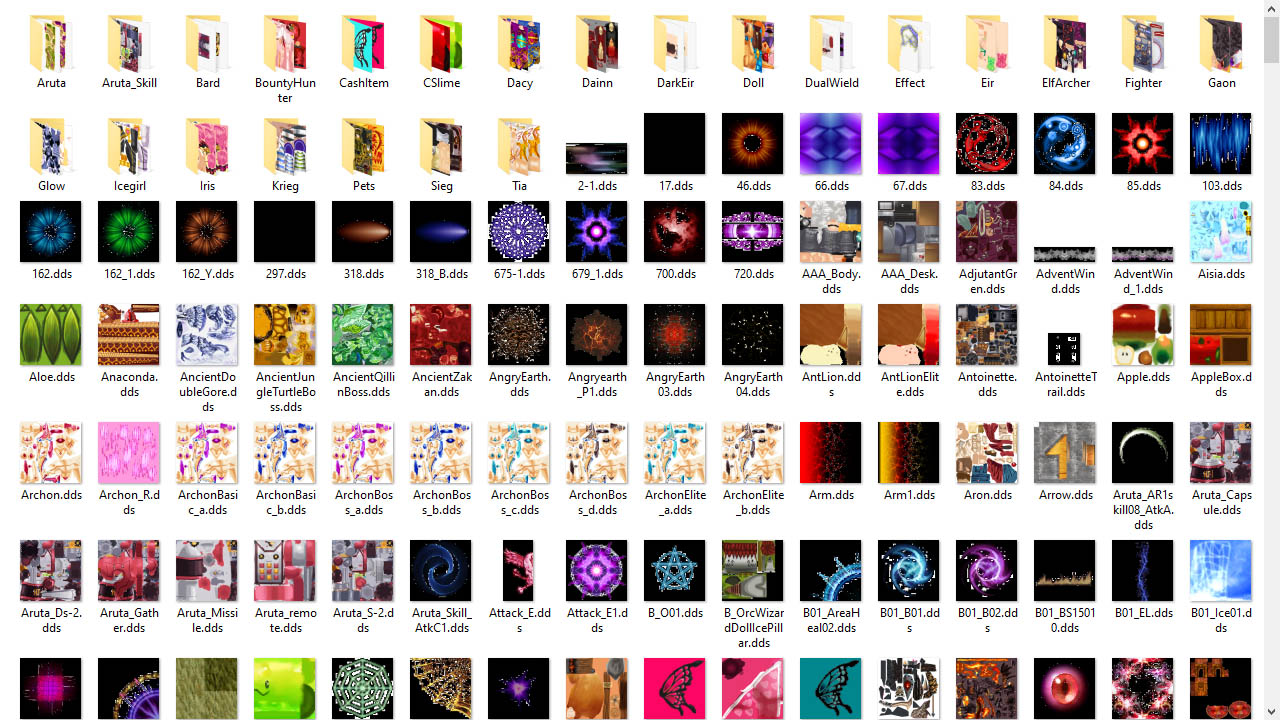
Over 15.000 .dds textures for every single 3D model in the game at Mapping/, from characters to pieces of equipment to skill effects (screenshot below). There were also around a hundred textures for the stages’ visual elements (trees, rocks, buildings…) at Maps/*/Shared/.
Hit sounds, character attacks’ SFX, voice lines and a bunch of other sound snippets at Sounds/ all in the same .ogg and .wav formats, along with copies of the same ambiance sounds and background music that was outside the .cfp archive, for some reason.
All UI visual elements as .tga files and more .swf animations at UI2/, mainly inside UI2/imagesets/ and UI2/Stage/.
A lot of simple text files with different extensions everywhere. Some of them describing UI element positioning (.layout, .looknfeel), and mainly a load of .xml detailing camera configurations, coordinates for asset placement in stages, and just generally referencing assets via their file paths.
For the image assets, XnConvert made it easy to batch convert both .dds and .tga file types to the more common .png extension.
However, a lot of points still left me puzzled:
Most of the files at Shaders/ were .fxc ones. Upon further research, those appeared to be compiled HLSL shaders. As Lunia’s minimum requirements ask for DirectX 9.0, that made sense. However, as those are compiled files, trying to decompile those seemed way out of my league - or interest - at this moment.
Lots of stuff in Animation/ were .SkinnedMesh, .Skeleton and .SkinnedAnim files, with more at Maps/*/Objects, all seemingly custom formats, specific for Lunia. No obvious way of opening them, but I suspected those contained the 3D models, armatures/rigging and animation sequences, respectively.
The .LuniaMap files in Maps/ probably described the stage, I supposed. Also seems to be completely custom.
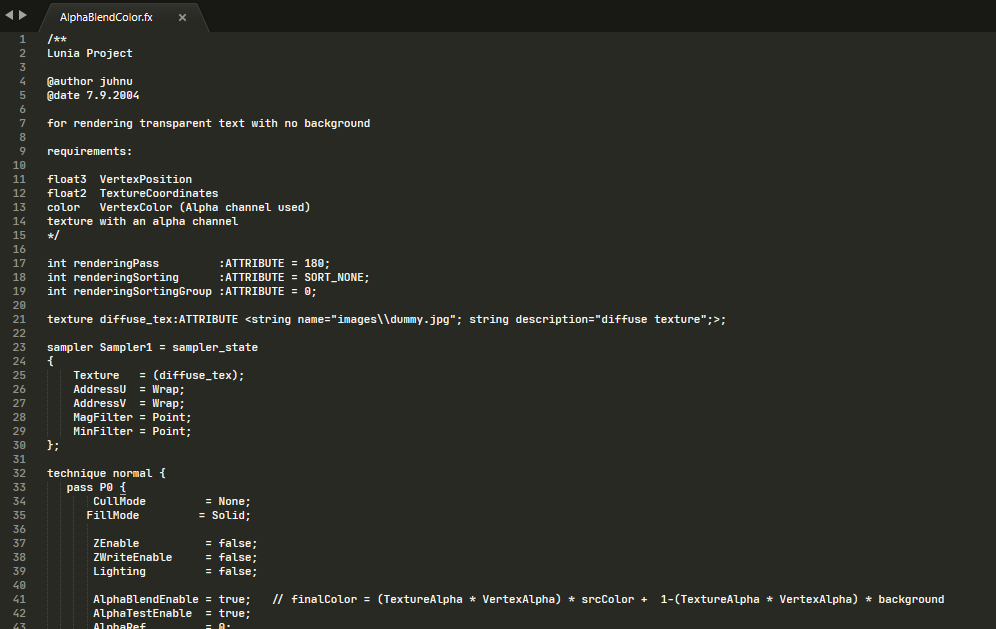
Where are the fonts?UI2/fonts/ had a ton of .xml defining different font styles by having different variables in them, but no .ttf files like I was expecting. However, Shaders/ had a couple .fxc with a pairing .fx of the same name. When opening one of them (screenshot below), it surely had something to do with rendering text. Could the fonts be fully rendered via shaders? Is that even possible?
What about all the equipment stats, drop tables, and all the numbers that a hardcore player would love to have at hand? I supposed that for bigger flexibility for balancing tweaks and the like, those would not be in the client files, but server-side.
It’s also interesting to note the information in the file header: the game is referenced as Lunia Project; the file author, juhnu, is possibly Juhani Honkala, who is credited as “Lead Graphics Programmer / Technical Director”; and the file date, 2004 - Lunia was launched in 2006.
At this point, after some days of exploring all files and reading most of them from top to bottom while trying to understand how the big web of .xml files relate to each other, I got pretty tired of that. Being happy as a result of extracting all item and skill icons as well as all UI elements, I felt like playing with them for a bit…
3. Playing with UI
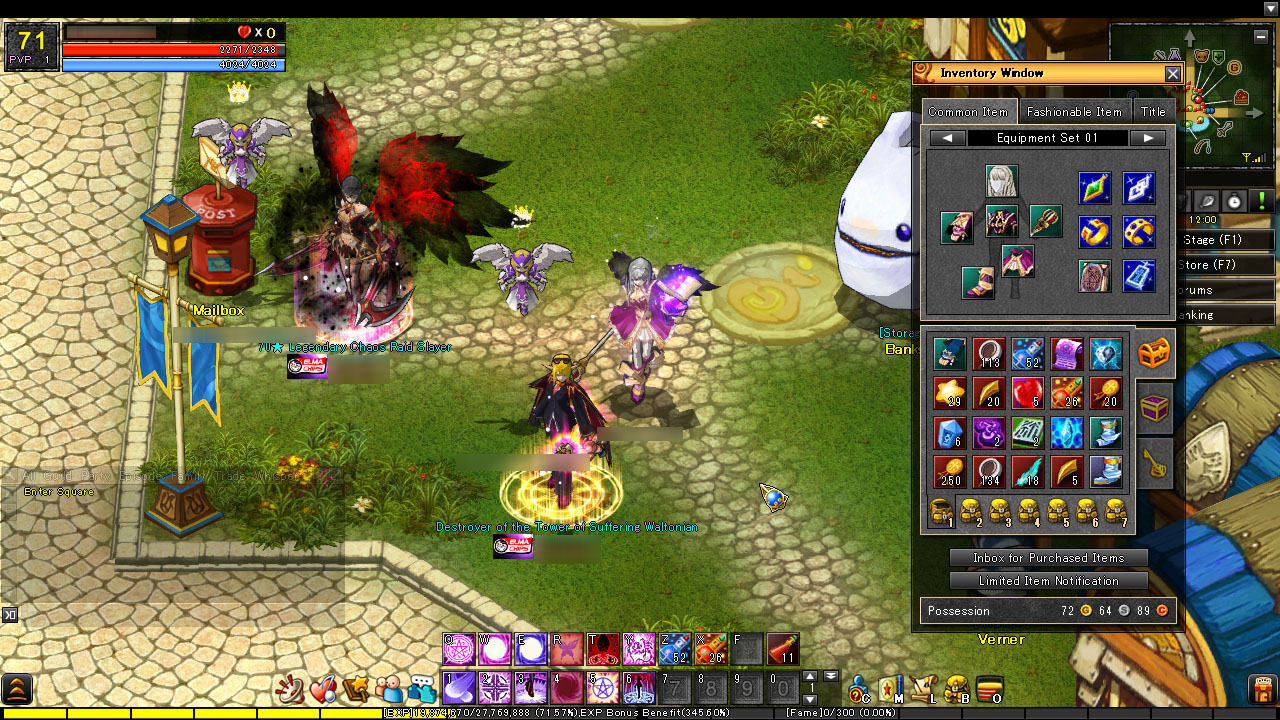
It had been a few years since I had last made a project with a graphical interface. With the spark of motivation from having those thousands of 32x32 icons in hand, I felt like coding a clone of Lunia’s inventory window. Here it is, in-game:
Although I’m almost completely sure Python is not the greatest tool for that, it is the one I am most comfortable with, so I chose Pygame as the graphical library. I had tried to use it a couple times in the past, but never managed to build anything that looked polished enough, probably for the lack of general programming experience at the time.
One common misconception is that Pygame is a game engine. It’s actually way lower level than that: Pygame is a set of Python modules built on top of SDL, but, for my specific use case, it served mostly as a simple library that allowed me to draw images at certain positions a bunch of times a second. And having to write code to make higher-level functions out of that is exactly my cup of tea.
I first started taking screenshots of Lunia’s inventory and modifying pixels here and there, like expanding the item slots to a single 8x8 grid instead of 7 separate 5x4 bags, simplifying the equipment tabs to only one and removing the currency altogether. After a while of getting a feel for Pygame, I managed to make the item icons draggable, have them snap to the actual slots, draw that cute hover effect and have a solid back-end for all of that: well-thought-out data structures to store inventory and item properties. It was at this point I realized I needed a big refresher on some Object-Oriented Programming concepts, which led me to one of Raymond Hettinger’s talks - Hettinger has done excellent work as a Python Core Developer, and if you consider yourself an intermediate Python developer, I highly recommend watching all of his talks, which was exactly what I did in the days that followed: binge-watched them as if they were a Netflix show.
The next challenge was to show the item quantities, in the lower right corner of their icons. Of course, a requirement for that would be the fonts, which I still hadn’t managed to find in the game files. With that, I decided to just screenshot the numerical characters and manually create a spritesheet with Photoshop and some patience. Next, some more hours of work went by to build higher-level functions that drew strings of numbers at the appropriate positions.
Then, I spent some more days refining the code (and rewriting it all from scratch to apply my newly gained Pygame and OOP knowledge) and implementing some of the remaining, most obvious features: item swapping, equipping and unequipping, stacking and splitting, and a bunch of other small touch-ups. It’s at those times you stop to appreciate the fine art of UI/UX development: it turns out game UIs have so many small details that we take for granted when playing but stick out like a sore thumb when you forget to implement them.
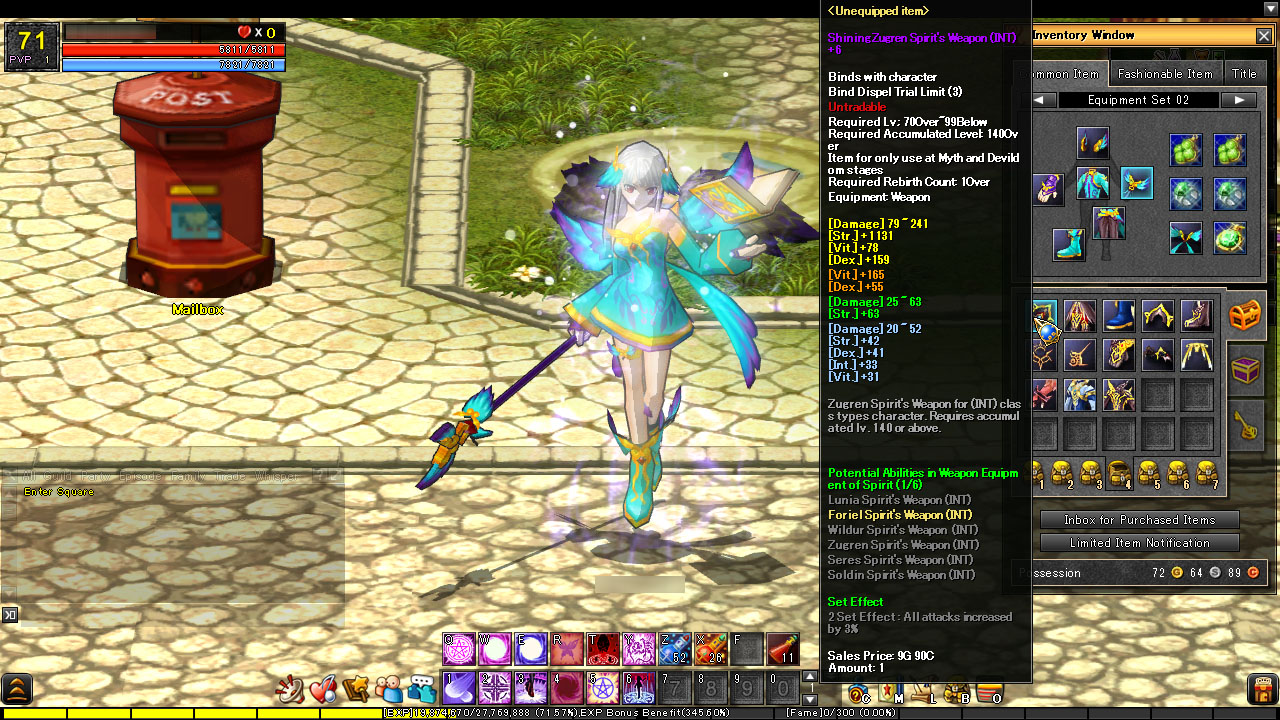
For my next trick, I figured I would try to draw the description textboxes. You know, when you hover over the item, and a textbox pops up with its name, properties, stats, description, and all the cool stuff? Here’s another screenshot showing the original thing:
Great! Now I just grab the font files and… well, there are none. I will have to make them by hand, again. After a bit of in-game exploration, it turns out all of the fonts used throughout Lunia can be summed up in four styles, three of them present in the screenshot above: regular (e.g. currency amount, at the bottom), bold (e.g. item description textbox, window title), regular with stroke (e.g. equipment tabs, at the top), and bold with stroke. As shown, they can be in varying colors (and stroke colors), and sometimes even sizes - I chose to ignore different text sizes for now. Upon further inspection, all of the styles derived from the basic, regular one: the stroke is done by simply painting the 4-connected pixels, and the bold sprite is simply two of the regular one, the second being drawn offset one pixel to the right.
Well, I once again built the characters’ spritesheets by hand. Thankfully, as with most of the game’s assets, they are quite fixed in size and there’s no anti-aliasing at all, giving them that pixel-art feel which I adore. Having the four spritesheets ready (which could be just the regular one, but I figured it was easier to “harddraw” all of them instead of using code to apply the bold and stroke effects), some more days went by on writing a very flexible and optimized text drawing module, complete with text coloring, left/center/right alignment, line breaks and text wrapping. The character widths are variable, but the heights are, for the most part, constant. However, the horizontal spacing is quite wonky. For my implementation, I decided to ditch any attempt at kerning and just set a constant 1-pixel spacing for every character, which, if I do say so myself, turned out better than the game itself. To test it isolated from the rest, I decided to write a basic text editor:
With that out of the way, I rewrote the code for the item quantities to now use the shiny text module. As a bonus, I also used it to draw the window title, now being able to freely rewrite it instead of being baked into the background. Cool! Now I just have to draw the description textbox itself, and… then I realized that’s not going to fit into my measly inventory window.
Okay, I could simply make the application window larger, but where’s the fun in that? What if I made the window draggable? Of course, that meant having to basically rewrite the whole thing once again as to, per best OOP practices, have a Window base class for every other window to inherit from. In turn, that would give me not only draggable windows, but multiple ones. And they may have different sizes and titles. And they may overlap. And I would have to deal with how to choose which one to send input info to. At this point, the project scope exploded, and I decided to just go for it. After a couple more days, I now had a full window manager thing going on. Once again, many small UI/UX elements and concepts that I always took for granted and had to account for.
I then rewrote most of the initial project’s code, adding another window modeled after one of the game’s fishing windows, with the (fake, fixed) total fish counts. Some more hours into a new description textbox module, and another bunch into building a parser to process formatting tags for me to easily mix and match different colors in a single block of text…
For now, the large item description and stats shown are hard-coded. I had the item names and descriptions from the localization files, but not the stats or the other properties. However, the code is flexible enough to handle that whenever I get my hands on them. Also, I later packed up all 25.000+ icons into a single spritesheet using TexturePacker, as that makes loading them into memory way quicker.
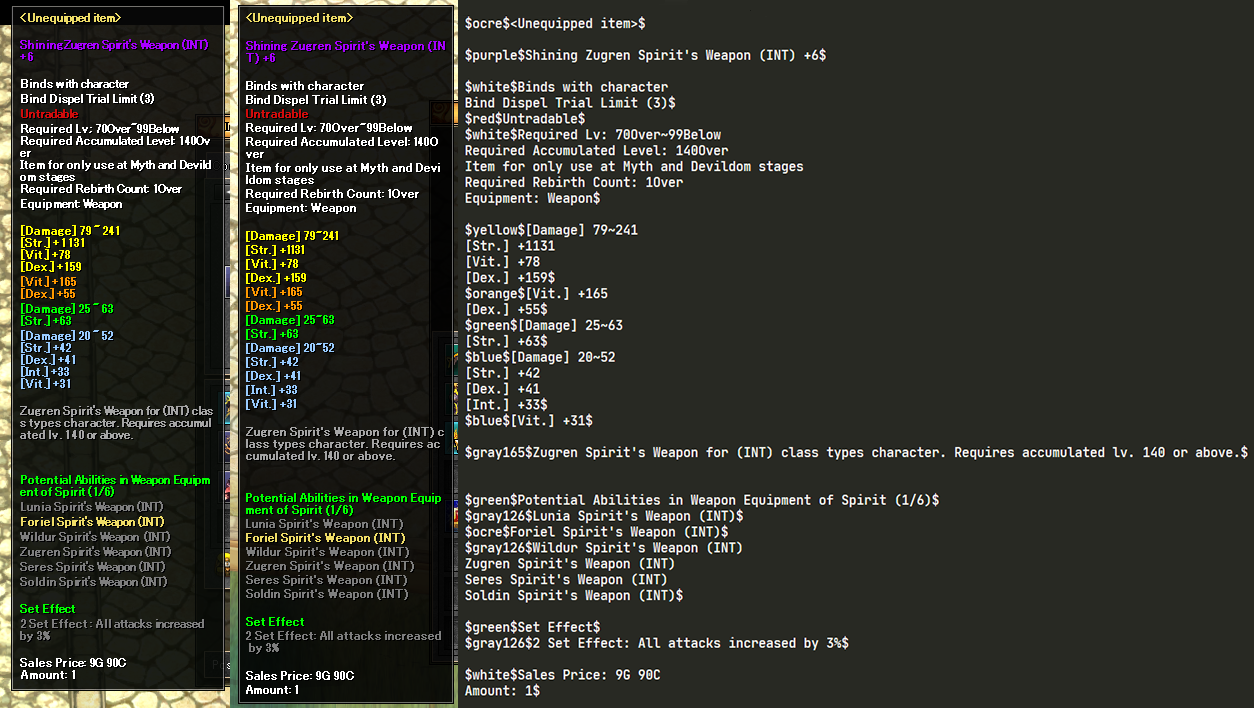
As the video compression kinda kills it, here’s an uncompressed side-by-side comparison of the textboxes, with Lunia’s on the left and mine on the right, together with the source text with my formatting tags used to generate it:
All in all, the window manager / inventory clone runs at around 500-700 FPS on my machine (Ryzen 5 3600), with lots of pending optimizations still. Of course, there’s a lot more that can be done, and I do plan on spending way more time working on it. One of the ideas that sounded interesting at that moment was to build some sort of model viewer, so I could have my 3D character dressed up with the currently equipped items. However, to do that, I would need the actual 3D models, of course. So, I went back to scavenging…
4. 3D Meshes
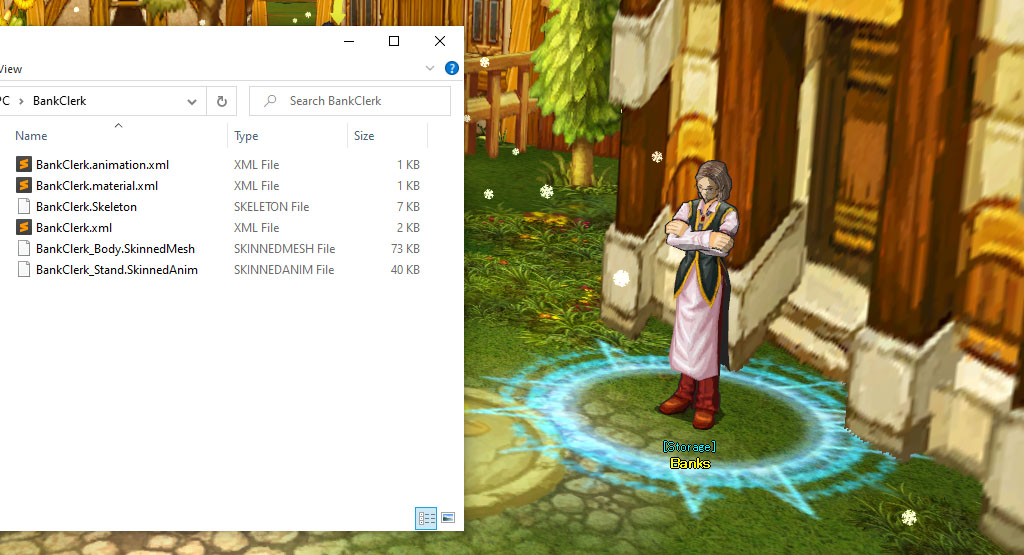
I had never fiddled with 3D stuff before, but I knew some basic concepts and I’ve been wanting to play with modeling for quite a while now. Having barely any previous experience meant that trying to reverse engineer Lunia’s 3D files was a quite daunting task. Well, I already had all the models’ textures, but not the models themselves. My best guess was still the Animations/ directory: if I navigated to Animations/AlliedNPC/BankClerk/, here’s what I got, alongside the Bank NPC at the Square, which I assumed the files represented:
BankClerk.material.xml referenced the model texture located at Mapping/; BankClerk.animation.xml linked the .Skeleton and .SkinnedAnim files, and set the animation variables speed to 30 and playback to 2, whatever those meant; and BankClerk.xml simply defined an object of type Character::SkinnedModelInfo that tied everything together.
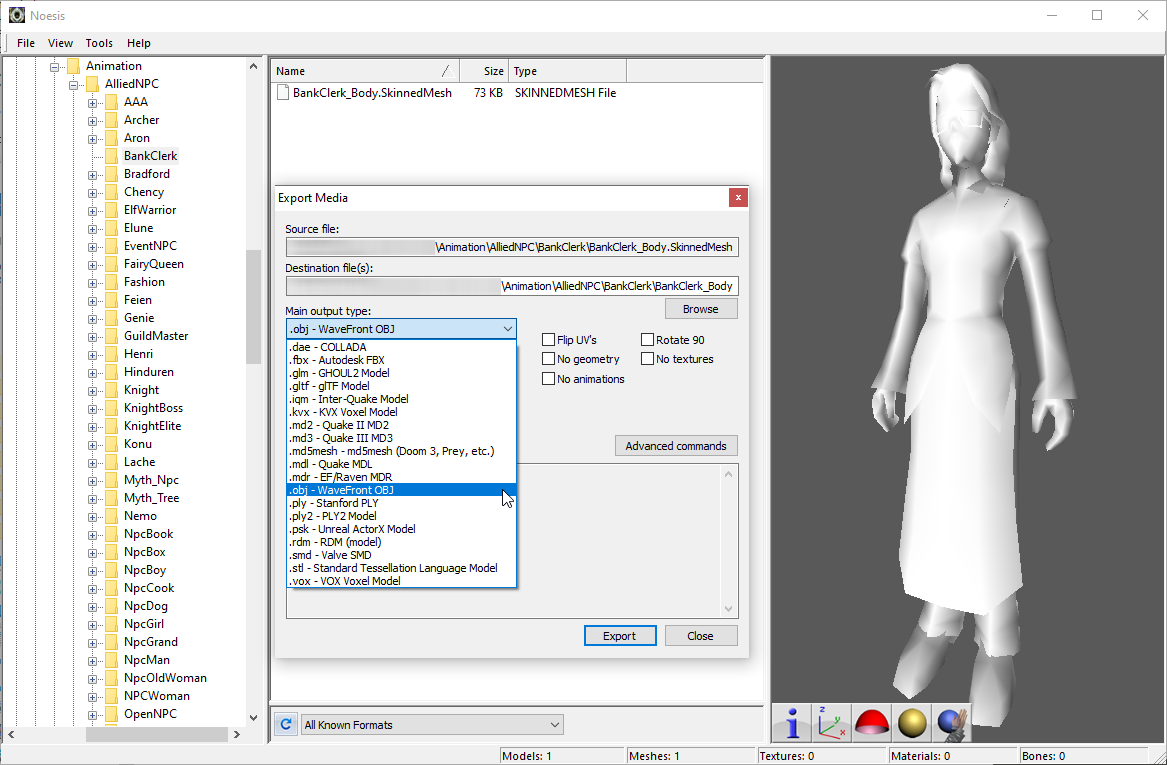
After lots of searching around the web for something that could make some sense of those files, I finally found Noesis, which seemed to be a tool for opening and converting 3D models, with an easy API for people to write plugins for custom file types. With the program itself, I also found a custom plugin for .SkinnedMesh files. Bingo!
Well, Noesis has 20 or so file extensions for me to choose from, and none of them were familiar to me. Here’s when I realized I would have to pause for a while and learn a bit about 3D animation before continuing. First, I decided to set the initial goal of being able to export the models (textured, of course) to something like Blender. I also quickly found out that the most friendly, and possibly common, filetype for 3D models is the .obj extension.
To start, I learned that a (basic) textured 3D model consists of:
A list of vertices, or 3D points, usually represented by 3 floats.
A list of faces, usually of triangles, each defined by a subset of the vertices. Together with the vertices, they form the model’s mesh.
A flat texture file, usually a square image.
A UV map, which defines the relationship (mapping) between the mesh and the texture.
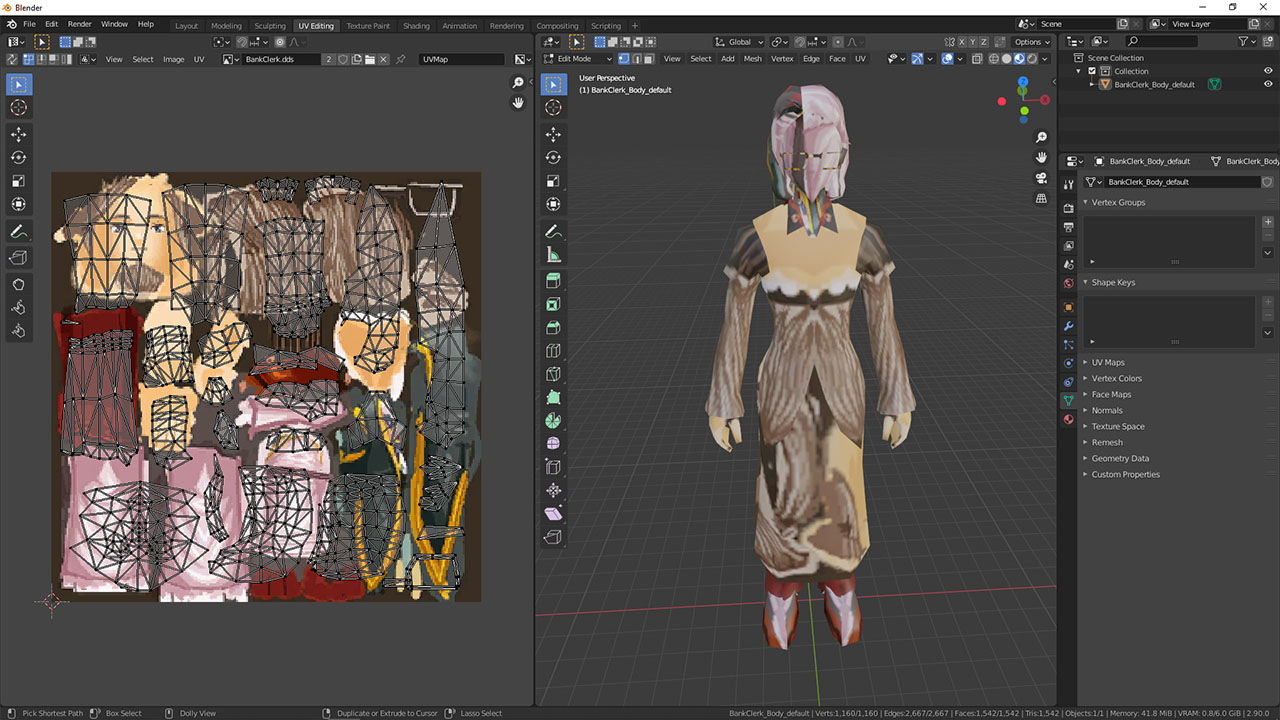
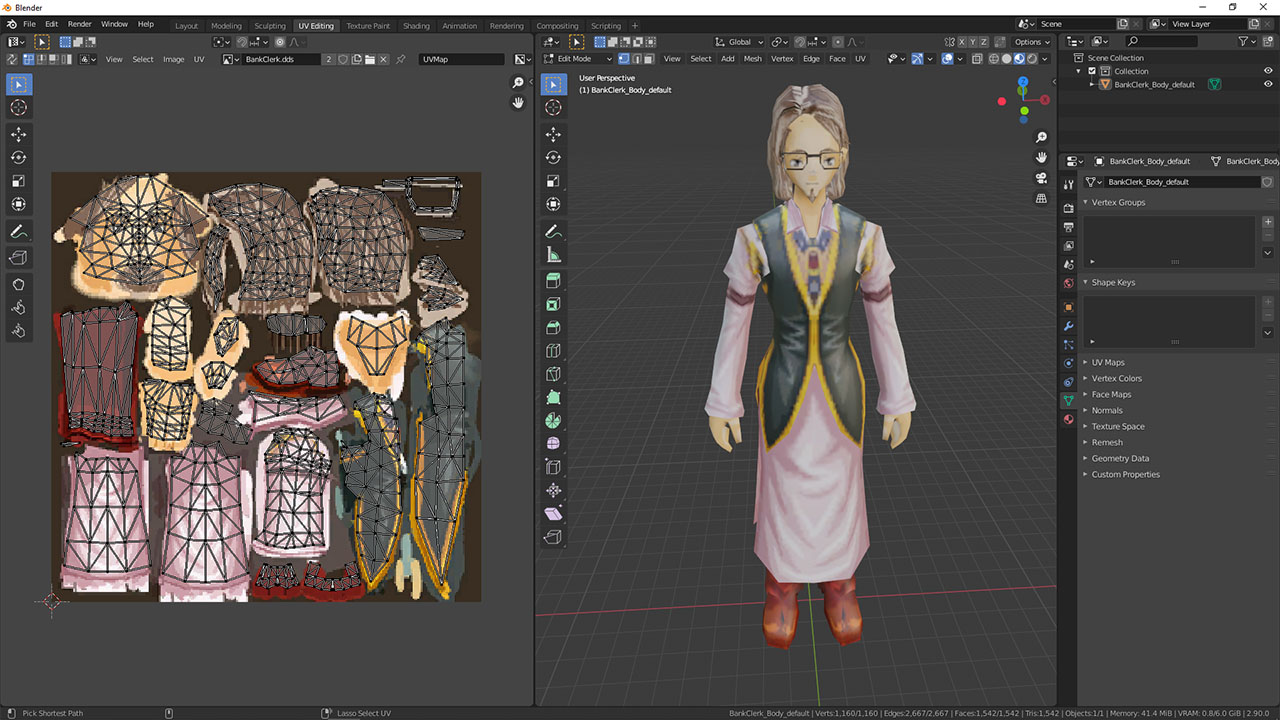
Well, I already had the texture file. Maybe the other 3 elements were in the .SkinnedMesh that Noesis loaded? Indeed they were, plus a list of vertex normals, which were all successfully exported to an .obj file. I then spent a few hours learning Blender’s interface and key bindings, imported the newly generated file, and all was good. But when trying to add in the texture, the UV map seemed a little bit out of place…
Although using sy-1 (Blender shortcut for “scale -100% in the y axis”) seemed to fix it, it also introduced a subtle vertical offset. It’s easy to notice the texture being a bit out of place on the character’s shoes:
I figured I would try to modify the conversion script so it flipped the UV map on the y axis by applying the transformation (x, y) -> (x, 1-y) on all vertices (the Flip UV's option in Noesis flips it in the x axis instead). However, to do that, I was forced to understand what the script was doing, and, consequently, what exactly that custom filetype was. After exploring the script and the file’s binary data, the (almost) full definition of the .SkinnedMesh filetype is:
// Little Endian// 4-byte ints, 4-byte floats, 2-byte shorts, 2-byte chars (UTF-16)intN;// length of the model namechar[N]modelName;// string for model name, ending with 0x0000 (\0)intV;// # of mesh verticesintI;// # of mesh vertex indexes (3 * # of faces)intunknown[6];// unknownshortfaces[I];// mesh faces, 3 by 3intV;// # of mesh vertices (same as before)floatvertices[3*V];// mesh vertices, 3 by 3intV;// # of mesh vertices (same as before)floatvertexNormals[3*V];// vertex normals, 3 by 3intV;// # of mesh vertices (same as before)floatuvMap[2*V];// UV map vertices, 2 by 2intV;// # of mesh vertices (same as before)// a lot more data, unknown
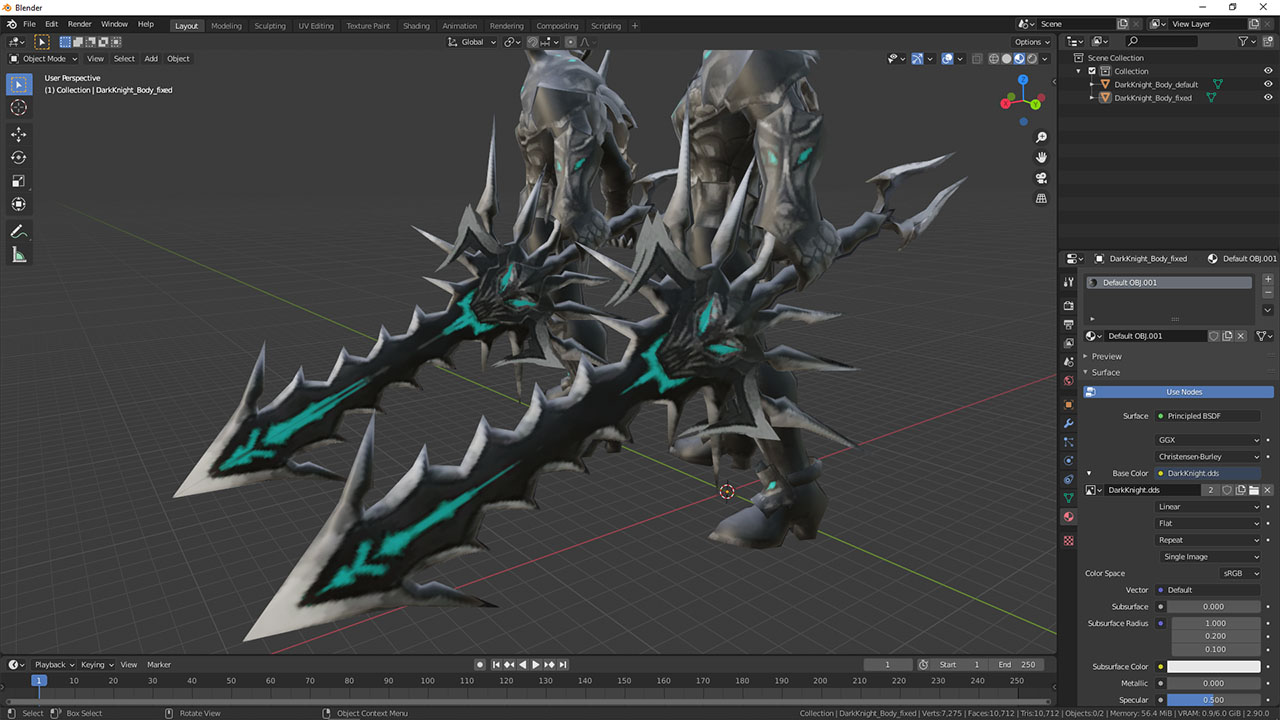
And it worked, without the small inaccuracies inserted by Blender! Here’s a more pronounced example, in which the back model was the one that had the UV map flipped by Blender, and the one on the foreground had it flipped by my modified script:
Here’s the snippet of (really ugly) Python code that I wrote to flip the y coordinate of all UV map vertices:
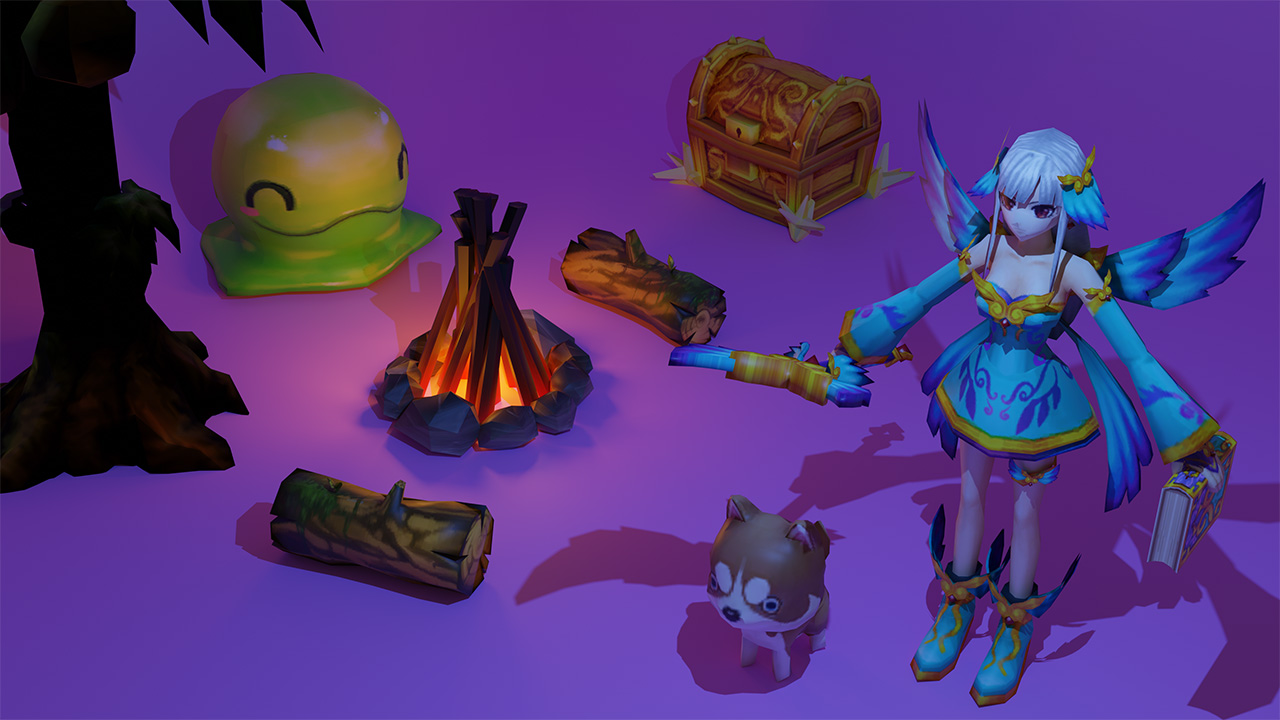
With that fix, around a dozen Blender tutorials, and going face first into that rabbit hole, I exported some other models and textures and rendered a basic scene:
It’s interesting to note that, for the character on the right, I had to piece together the models for each body part, as there’s an individual model for every piece of equipment in the game. I decided to pick my favorite equipment set: the one from the Forest of Water (Myth 2), which matches the one my character is wearing in some of the screenshots shown earlier in this post. It’s also clearly in a different pose than in-game, I wonder why…
5. 3D Rigging and Animations
A 3D rig, also known as an armature or skeleton, is a collection of “bones” that each relates to a subset of vertices from its mesh and may be connected between themselves. They mainly serve as a tool for creating smooth animations for the model by automatically deforming the appropriate vertices without having to manually manipulate every single one of them for every animation frame. Most rigged models are usually related to characters, but anything that moves may have a skeleton as well. In the context of Lunia, other than all playable and non-playable characters, most of the spells also have an armature attached.
With that in mind, it became pretty clear that .Skeleton probably defines the bones, and .SkinnedAnim should list a series of frames and the rig’s movement between them. Unfortunately, I couldn’t find any previous work done on any of those files anywhere on the web. Although that Noesis plugin handled the meshes, there’s absolutely nothing regarding armatures or their animations. So this time I had to go barehanded.
At this point, the BankClerk model was the one I was the most familiar with, and it looked as simple as a humanoid model could get, he only had one of each: .SkinnedMesh; .Skeleton; and .SkinnedAnim, and being a humanoid, I figured his correct skeleton and movements would be quite easy to recognize. With most of the .SkinnedMesh figured out and the assumption that .SkinnedAnim probably acts on the .Skeleton, it was easy to choose the next one to tackle.
This was my first time analyzing a binary with no information before. I thought a first good step would be to open a couple other .Skeleton files as well, so I chose Animal\Bear\Bear.Skeleton and AlliedNPC\Knight\Knight.Skeleton and kept comparing the three of them with each other to spot similarities and differences.
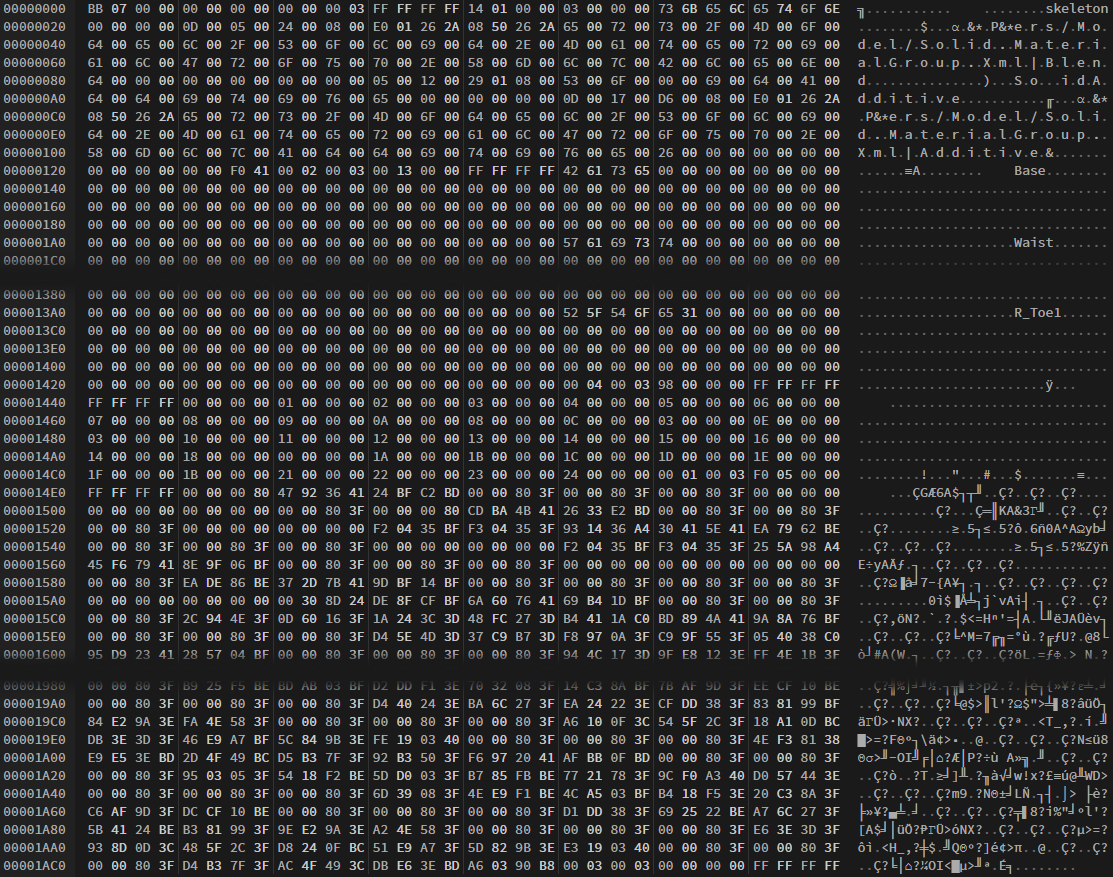
The BankClerk.Skeleton file had 6880 bytes in total. Here’s the most interesting parts of the file’s binary data, from HexEd.it:
Based on some assumptions taken from the .SkinnedMesh exploration, I started taking notes. Well, the first bytes seemed simple enough: some UTF-16 strings containing what looked like file paths…? Considering the SolidMaterialGroup.Xml string, I supposed they referenced the other related files. Next, I spotted quite a couple FF FF FF FF sequences: they seemed to be separators for different data sections: whenever the byte patterns changed, there was a FF FF FF FF between both parts.
After the UTF-16 strings section, there were 38 UTF-8 strings of 128 bytes each, zero-padded, of quite suggestive content, leading me to believe they were all bone names: Base, Waist, Chest, Chest1, L_Shoulder, L_UpperArm, all the way to R_Thigh, R_Calf, R_Foot and so on. I wonder why they are all of fixed length, as most of the 128 bytes for each string are wasted.
After that (if you are following along on the image, this is at line 00001420), comes:
00 04 00 03: I had no idea what those are, but they are in all .Skeletons.
98 00 00 00: that’s 152 in decimal, which happens to be exactly 38*4! Don’t know what to do with that, though.
FF FF FF FF FF FF FF FF: two separators, yay.
37 ints: 0, 1, 2, 3, 4, 5, 6, 7, 8, 9, 10, 8, 12, 3, 14, 3, 16, 17, 18, 19, 20, 21, 22, 20, 24, 0, 26, 27, 28, 29, 30, 31, 27, 33, 34, 35, 36. It’s a list of integers going from 0 to 36, almost sorted, with some repetitions.
00 01 00 03: Same, no idea, is in all .Skeletons.
F0 05 00 00: 1520 in decimal… 38*40! So what?
FF FF FF FF: another separator.
Now came the scary part: 1528 bytes (that’s 38*40 + 8…) until the last 4, another separator. Again, if you are following on the image, that’s at line 000014E0.
I assumed there had to be at least 38 triplets of floats somewhere, to represent one vertex for each bone name found earlier, somehow. As 1528 is indeed divisible by 4, the size of a float (or int), I decided to break it down into 4-byte groups, and doing that, I noticed there were lots of triples of 00 00 80 3F. By looking at the character representations of the binary data back in the image, they can be easily spotted by the sequence ..Ç?..Ç?..Ç?. With endianness in mind, it turns out that 0x3F800000 in IEEE 754 is exactly 1.0! That left me confident I was on the right path.
Taking the 1528 bytes, ignoring the first 8 (00 00 00 80 47 92 36 41), and splitting the rest into 38 groups of 40 bytes (10 floats) each gave me a hunch to further split those 10 floats into groups of 1, 3, 3, and 3. Here’s a snippet of that, with prettier whitespace:
Assuming they keep their order, each of the 38 bones has a name and 10 floats related to it. If I enumerated them from 0 through 9, for each of the groups of 10:
0: Unsure. Definitely a float, though.
1, 2, 3: Unsure. In most of the .Skeletons, all 1.0s. Rarely, may have a slight (±0.2) variation.
4, 5, 6: Unsure. In all of the .Skeletons, are in the interval [-1.0, 1.0].
7, 8, 9: Those were all over the place. Looked like coordinates.
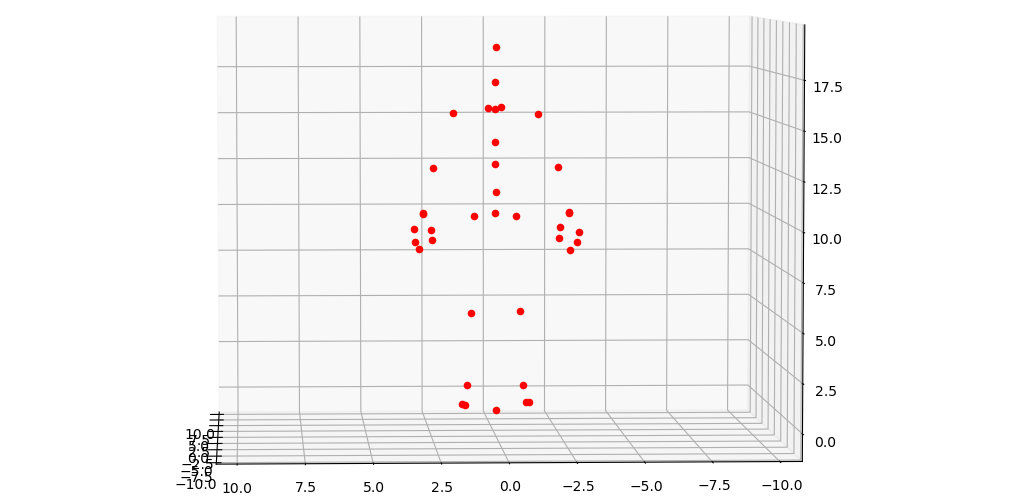
Of course, I took the last three floats of each of the 38 groups and threw them into matplotlib as if each of the triplets were a point in 3D space:
Boom. I had something that looked like a humanoid figure.
Do keep in mind that this took a whole day of staring at a bunch of bytes, but the feeling when I finally had the plotted coordinates was so, so worth it. Well, I supposed the next steps were to “connect the dots”, right? I then watched some hours of Blender tutorials on rigging, to finally try and understand what armatures really were, and what I should be looking for.
Ideally, most of the bones should be interconnected, so when you move a shoulder, the arm moves as well, and so do the fingers. If you twist the waist, their whole upper body should move accordingly. That strongly suggested some kind of hierarchy, which instantly made me think of trees. The only data on the file that could possibly have something to do with hierarchies and tree structures were the sequence of almost sorted 37 ints located right after the bone names and the points.
However, having one fewer than the number of bones kinda threw me off for a good while.
After more hours of staring at binary, I realized most of the bones were listed in an almost sorted order: L_Shoulder, L_UpperArm, L_ForeArm, L_Wrist, L_Hand, L_Finger1, L_Finger2, L_Finger3, L_Thumb1, L_Thumb2… All of that almost matched the number sequence in question, but putting both lists side by side didn’t make much sense, and neither did the names, until…
Until I realized there had to be a reference point for the whole model, a Base. The trick was that, although its name was listed first, it was actually the last point in the file. With that fix, I could now properly match the points and names. Moreover, the sequence having one less element than the amount of bones probably meant there was none for the Base bone, which made everything fit.
The number sequence was a serialized tree, with each integer representing the index of the parent bone, with 0 being the base (last bone). When I finally connected everyone to its parent…
I quickly wrote a Python script to load any .Skeleton and output their armature using what I had found so far. From experimenting with a bunch of other models, a couple of them seemed to be a little bit skewed, or with all of the points in the same plane, or with some other deformations, which probably indicates there’s data missing. Well, I guess it’s got something to do with all those other floats I completely ignored along the way.
Also, it was not that big of a surprise that all player characters had over a hundred bones each, complete with wing bones, skirt bones, weapon bones… Some of the main bosses also had more complex skeletons, and I then realized tackling the bank guy first was a great idea.
The .SkinnedAnims were still left untouched, for now. I did take a look at them, but I still feel that completing my understanding of the .Skeletons were a must before going further, so no advancements made there. Once more, I tried searching for answers and previous work online, when I stumbled upon…
6. Server Files and Game Source Code
I got my hands on a huge collection of files, along with tutorials on how to fire up a server, as well as the source code itself. I supposed all of that were leaked, somehow? This was mostly a general exploration, as an attempt to better understand the architecture and find the data tables and such.
Lunia’s servers ran on ASP, IIS, and MSSQL, all on top of Windows Server 2003. It’s interesting to note that it appears each Town Square was a single server instance, and each chat channel was also an independent IRC-based server. As the technologies used were ancient compared to the ones available today, and most of the files I had were barely functional, I have to admit I wasn’t much interested in trying to set up my own server or investigating further. After snooping around for some minutes, I turned my attention to the real interesting stuff: the game source code and development files.
Lunia itself was built on Visual C++, and seemed to have grown alongside its own custom engine, “XRated”. With it, there were dozens of custom tools to create and edit items, quests, pets, chests, and so on. A lot of code had the purpose of converting to and from those pesky custom file formats, and so they are probably very helpful for reverse engineering them.
All the “compiled” files found earlier in the client data could also be found here, like the .tga files that eventually generated all .dds 2D assets, all the .xml that eventually became the .b databases, and the uncompiled .fx shader code that were loaded in the client as compiled .fxc.
Here are the most interesting bits, and what I was actually looking for:
A conversion table for items, skills and characters, to a unique integer hash, used in all other files.
All item stats and properties (e.g. is tradable, is usable, cooldowns, level requirements).
Tables for all fortifications and their stats multipliers.
Tables for fishing rods, drop rates and other variables.
All quest data, requirements and rewards.
All shops, items for sale, sales prices, etc.
Skills and its requirements, damage, cooldowns, etc.
I then grabbed most of the data tables and spent a day or two writing a dozen Python scripts to parse the .xmls and convert parts of them to JSON objects, which I plan to use later with the Pygame application from before.
The code documentation was… rough, to say the least. Lots of comments were in Korean, and the code style in general was definitely inconsistent - I did find a .txt that listed some guidelines, though! I also found a comment in one of the files that handled the animations, which simply wrote “banco de gaia - celestine”. I wonder if that was the song whoever wrote that piece of code was listening to at the time?
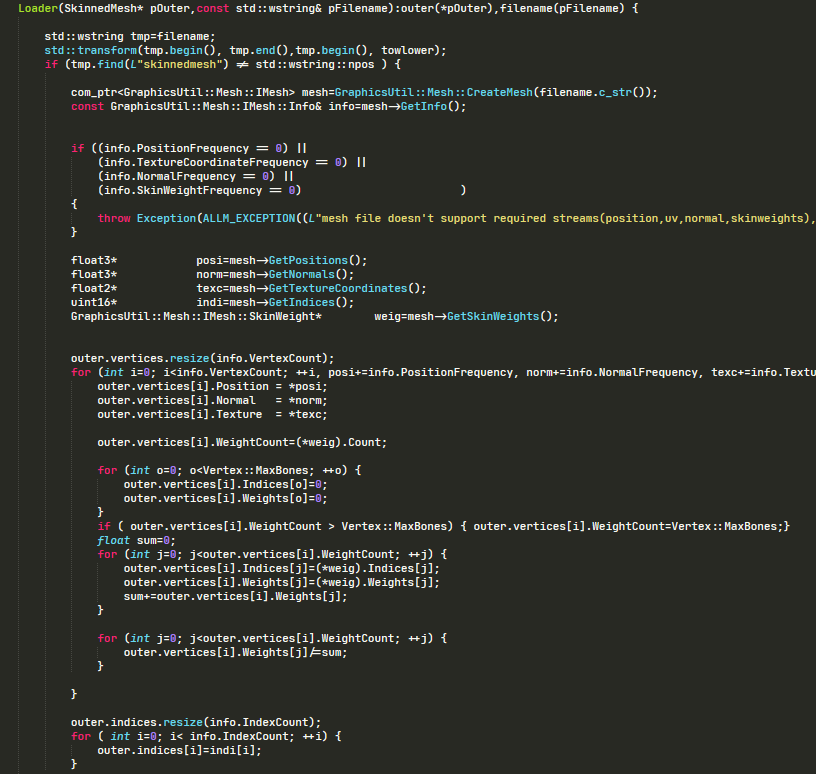
Of course, there was also all the code for the graphics rendering, like the one above. Most of them were also authored by juhnu, the same name found earlier. I managed to find the code responsible for loading the 3D model files mentioned in the last section, and some of my assumptions were confirmed, while others were corrected.
The last section of the .SkinnedMesh files are, per the code that handles it, “skin weights”. Not sure what to use them for, but oh well.
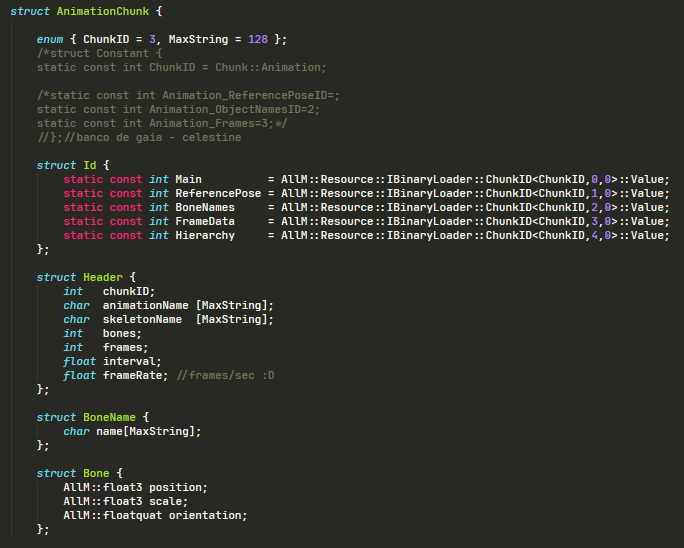
.Skeletons are indeed composed of a header, a list of bone names, a bone hierarchy and a reference pose. A bone struct is composed of a float3 position, float3 scale and floatquat orientation. Could the latter be a quaternion? Interesting…
.SkinnedAnims are made of starting and ending frames, a speed modifier, a list of frames, a list of bones, a frame interval and a frame rate. The animation code does give more hints on how to decompose the files.
There’s still a ton of stuff for me to go through, and I feel all of this was just a glimpse of the whole codebase. With that…
7. Future Work
As I wrote in the beginning, I still want to take all of this a lot further, which may make an update here or even as a whole new post.
Regarding the Python Inventory / Window Manager thingy, here’s what I’m planning as the next steps:
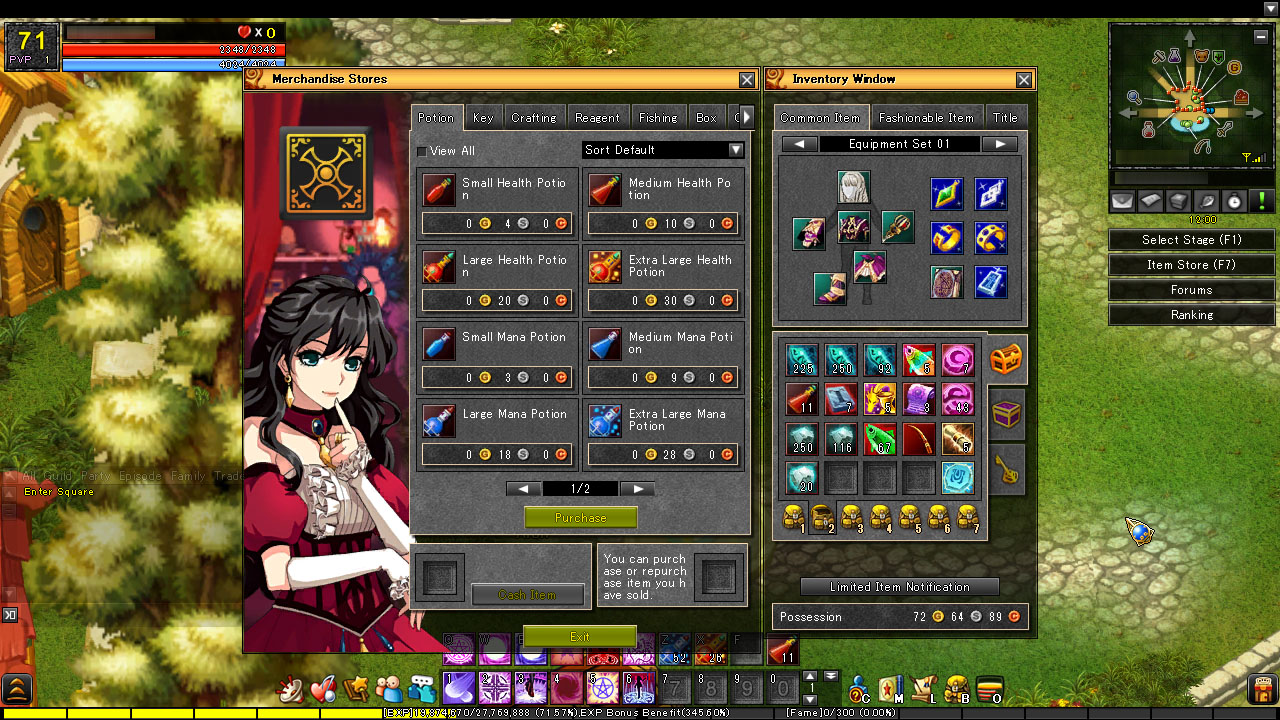
Item shops, buying and selling, and the currency itself (in-game screenshot below).
Item fortification, together with reagents and catalysts (in-game screenshot).
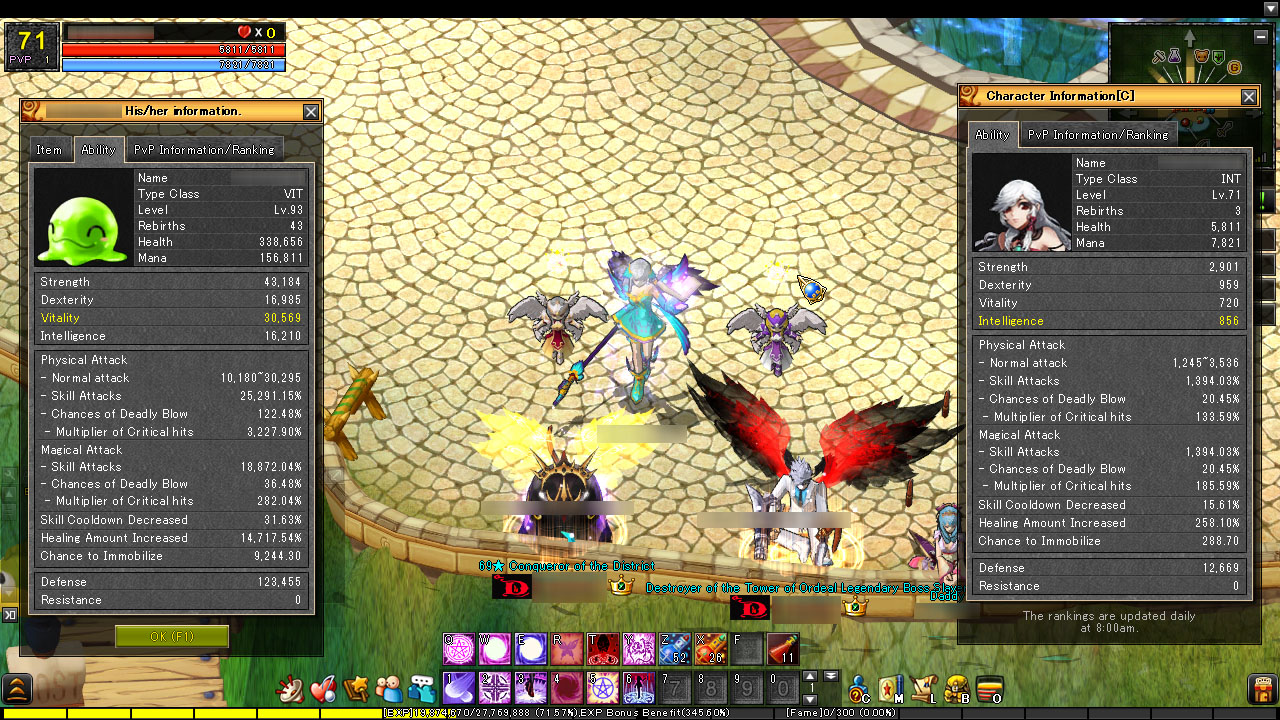
Stats calculations based on class, level and equipped items (in-game screenshot).
Fishing and all of its mechanics.
Extract item data to an item server and API, so as to be able to have the whole item database accessible without having to load it all on every app startup, as well as to mimic more closely the original game.
A “wardrobe” tool / model viewer, based on the currently equipped items. However, that wouldn’t be possible in Pygame, which is strictly a 2D library, so I would have to rewrite all of it in something else like Unity. That would be a whole new journey, once again starting from barely any experience, and I’m definitely looking forward to that.
Overall tidying up of the code, and greater adherence to best OOP practices.
With regards to the 3D assets, I may continue to work on them by:
Figuring out the remaining data in the .SkinnedMesh, .Skeleton and .SkinnedAnim files and how to convert/export them to Blender.
Further exploration of Blender, 3D animation and modeling/rigging - maybe even rendering short animations based on Lunia’s models if my creativity and artsy skills allow.
3D printing characters to create small figures - if I manage to get access to a 3D printer.
At last, about the server files and source code:
Finish opening and reading every single file and see what else I can find, as well as what logic I can replicate.
And… whatever else might pop in my head during all of that.
8. Closing Thoughts
It’s quite interesting to note how much software development has changed over the last 10 or 15 years. As I could notice by the server files and source code, there were barely any design patterns or previous work done on MMORPGs and game engines back then, as most of the filetypes, encodings and tools were homemade and custom to Lunia.
Furthermore, I don’t think I’ve previously worked on anything that mashed together so many different areas and technologies like this. Trying to reverse engineer as much as I can from Lunia has been a great learning experience, including regarding topics I never thought I would be interested in. It’s been a fantastic (and fun!) couple weeks, and I hope to have the spare time to keep exploring all of this for a while.
To wrap it up, shout out to @renatavinhaga, @mbrla0 and @gosiqueira for being extremely helpful in this whole endeavor. Finally, a big and heartfelt thank you to everyone involved in the making of Lunia. It definitely played a big role in my youth and in shaping me into who I am today, personality and career-wise. You are all my childhood superheroes.
]]>Games for Programmers (and Learners)2020-05-05T00:00:00+00:002020-05-05T00:00:00+00:00https://www.maiakanegae.com/games-for-programmers-and-learners
Games taught me all sorts of things: time management, fast typing, interpersonal skills, dealing with money and economy in general, and even how to read and write. Since I found out how exciting coding was, I turned my attention to the ones that can actually teach programming - and are still fun. Turns out solving puzzles using a made-up programming language inside a video game is as satisfying as solving a real coding challenge in a real environment, and best of all: the skills are transferable!
Compiled here is a list of my favorite programming games alongside a mini-review, in no specific order, for those who code - or would like to learn.
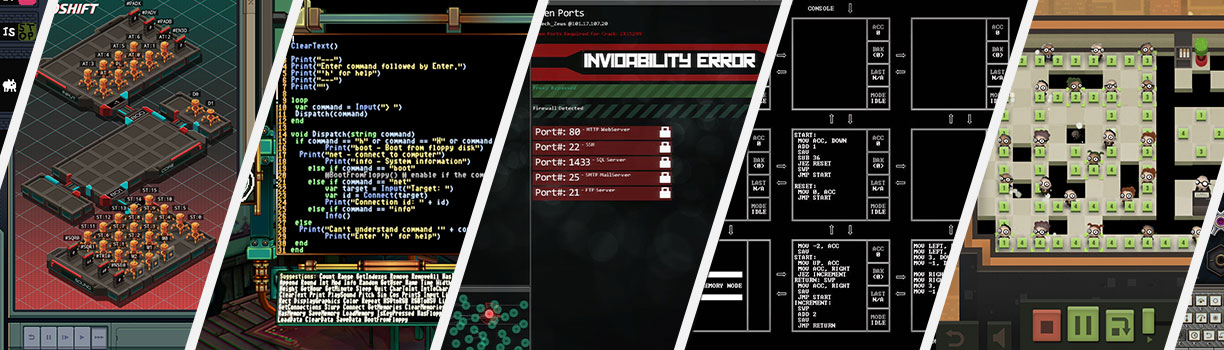
From Tomorrow Corporation, the creators of World of Goo and Little Inferno - which although far from being about coding are very much worth checking out -, comes Human Resource Machine and its sequel, 7 Billion Humans.
In Human Resource Machine, you control office workers that pick up and drop off little green boxes with data on them. To make them do stuff, you write Assembly programs (with cute blocks and graphics), with every level teaching you new tricks and giving you more toys to play with. It does start pretty basic, but later levels can pack quite a punch. Oh, and you name your variables by scribbling on a post-it note, and comments work in the same way.
The big change for the sequel? More people! You now have to command your own swarm of workers, as if you were programming a parallel computer! Naturally, there’s also a bunch of new functions and triggers for added complexity and fun.
The art style follows the same recipe as the other games from Tomorrow Corporation, as does the humor, both on point. The soundtrack does its job, but it can get repeating after a couple hours of play. Overall, Human Resource Machine and 7 Billion Humans are a great starting point for anyone learning or practicing programming logic, no matter the age or skill level.
Any list of programming games has to contain at least one of Zachtronics’ amazing titles. I do encourage you to check out all of them, but I’ll be listing my two favorite ones here. Probably the most “serious” games on this list coding-wise, most of them require you to actually study - PDF manuals in the game files detailing some computer architecture and its language syntax - so you are able to progress through the first level, and later ones can be a challenge to even veteran programmers. They all mostly follow the same recipe, with some spice added to it: learn a new Assembly language; write programs with it that do cool stuff; optimize it as much as you feel like it; share your solution with friends. Also, RTFM.
Exapunks is about hacking stuff to earn money so you’re able to buy medicine and survive. You write code to control EXecution Agents, the EXAs: small robots that are able to get into networks - and even your own body -, and fulfill contracts to “improve” candy production from the nearby factory, change someone’s bank account balance or hijack a highway digital billboard to show neat stuff. Be ready to dive deep into magazines from the 90’s detailing secret functionalities and specific language syntax. Arguably the easiest of the Zachtronics collection, so a great one to start with.
TIS-100 tasks you with powering up your deceased uncle’s old computer, the Tesselated Intelligence System, a “massively parallel computer architecture comprised of non-uniformly interconnected heterogeneous nodes”. Fancy. Write small snippets of Assembly code into separate CPUs that are able to communicate only with the ones adjacent to it. Learn about blocking and non-blocking operations and many other parallel programming quirks, and figure out the machine’s secrets while you’re at it.
A spiritual successor to 2001’s Uplink, Hacknet is at its core a hacking simulator. Of course, it’s quite far from the reality of real pentesters and infosec experts, but it does have some roots on real UNIX commands, ports, firewalls and networks.
You won’t learn much real programming here, but the amazing atmosphere, deep immersion and great storytelling are all there, supported by the greatest soundtrack across all games on this list - it’s on Spotify as well! Moral dilemmas, secret organizations and cool graphics are all just icing on the cake.
Hacknet’s main storyline can be played from start to finish in around 5 or 6 hours, and my recommendation is to free up a night in your schedule to go through the whole experience in a single session. It’s been 3 years since I have done exactly that, and I still get chills when listening to the last mission’s theme.
The best way to describe this game in one sentence is that it is the closest thing humankind got to a time machine. See, it’s Sunday night, you just had dinner, bought the game, played for what looked like 40 minutes and suddenly the sun is up, class started an hour ago, your friends are calling to check on your whereabouts and Steam says you’ve been playing for over 10 hours straight. No, of course that wasn’t me, why do you ask?
Factorio is a game about automation and logistics. Start small, stranded in a foreign planet with not much more than a pickaxe, a gun, and determination to build a rocket and launch a satellite. Then, craft resources by hand and build machines that can do the crafting for you. Design factories with increasingly complex parts and recipes, avoiding bottlenecks and maximizing output, all while controlling power consumption and protecting your base from alien attacks. Also, nuclear power. Also, trains.
So, where’s the coding? Factorio’s circuit network is Turing complete, much like Minecraft’s classic redstone mechanics, and people are able to do crazy stuff with it, but that’s not the reason for its inclusion on this list. The main game mechanic and goals have a lot in common with real-world programming: you have to plan before you build (code?), and you better modularize it. Otherwise, technical (construction?) debt is real - although, surprisingly enough, tearing down all the work done in the past few hours and rebuilding it, now bigger and better, is way more fun than it sounds. Not coincidentally, the intersection between Factorio players and programmers is fairly big.
As you may imagine, the learning curve is pretty steep (isn’t that true for most of the games here, though?), but learning the basics by yourself instead of watching a bunch of tutorials is absolutely worth it. Once you get into the “just one more thing and I’m done” loop, you’re set.
The game is still in Early Access (Update Aug. 14, 2020: Not anymore! Trailer above updated as well.), but don’t be fooled by it: Factorio is one of those rare exceptions where that is a big plus instead of an excuse. Also, the dev team maintains a development blog with weekly updates, often diving deep into technical details. A favorite of mine is FFF #317, which explains in detail the enemies’ pathfinding algorithm.
You have been warned: it’s crazy addicting, and the replayability is insane. The factory must grow.
Being the most recent title in this list, Satisfactory is, in a nutshell, a 3D Factorio. Still in Early Access (like, real early) and so it lacks many features that would make it deep, but the environments, buildings and creatures are gorgeous and the developer’s community engagement is great. As it’s 3D, it does require a beefier computer than any other game listed here, limiting the factory complexity to a way lower degree compared to Factorio (unless you are this guy). Satisfactory is already a beautiful and fun game and does look very promising. I will be sure to take a second look at it in a few updates.
Programming Games Backlog
Those are the ones that I haven’t immersed myself in enough yet to write a paragraph of opinion about it, but are right at the top of my big backlog of games that I want to get through. They are full of positive reviews all around the internet and so I felt like listing them here as well.
Else Heart.Break(): a mix of RPG, open-world and point-and-click adventure, with a story of love and friendship behind the programming curtain.
Baba is You: a game about logic and thinking outside the box. Not sure why, but it does tickle my fancy in the same way coding does.
Opus Magnum, SHENZHEN I/O and SpaceChem: of course, more Zachtronics titles that I’m looking forward to checking out. More of the same I guess, but in different flavors.
]]>Advent of Code 2019 in Review2019-12-27T00:00:00+00:002019-12-27T00:00:00+00:00https://www.maiakanegae.com/advent-of-code-2019-in-review
At last, Advent of Code 2019 has come to an end! If you are new to it, it’s an Advent calendar full of programming puzzles from December 1st all the way to Christmas, made by the amazing Eric Wastl every year since 2015.
This was my second year participating, but the first time actually completing all days before the end of the month! You can check my Python 3 solutions on my GitHub, and you can also keep reading for more info and my comments on the event.
Other than being a collection of 50 very fun programming puzzles (each day has two parts!), Advent of Code is also a competition, but only if you want it to be. And, way more importantly than that, it’s a mission for you to save Christmas! This year, “Santa has become stranded at the edge of the Solar System while delivering presents to other planets!”, and so every puzzle is space-themed! Neat!
The 2019 edition of the event also had a brand new twist: usually, there are only a couple of puzzles that rely on the solution of a previous one. This time, almost half of them did! Starting at Day 2 and revisiting it every other day from Day 5 onwards, we were tasked with building an Intcode computer: in other words, creating a Virtual Machine to run machine code from a very specific architecture description, much similar to the Synacor Challenge. I was introduced to low-level programming at my Computer Organization and Computer Architecture courses, and I’ve since loved doing these! Indeed, that was the highlight of this year for me, by far.
Of course, another big highlight was me actually managing to get some sweet leaderboard points! As puzzles unlock at midnight EST/UTC-5, aka 2AM my local time, it wasn’t always feasible to be up and ready to compete. However, I did get a total of 351 points, placing me at 196th on the Global Leaderboard! Although definitely far from the top 100, I’m more than excited about it.
All in all, I had an amazing time with it and I highly recommend it to anyone looking to learn or practice programming and problem solving. Now, to fill the void it left on me, I have to go back and complete all previous years…
Notable Comments
Day 1: Leaderboard get! The first day has always been a very simple problem to introduce newcomers to the event format and answer submission, this year being a twist on “sum all numbers of a list”. By hastily skimming through the problem statement and having my boilerplate code ready, I managed to finish Part 1 in just 46 seconds!
Day 6: Basic knowledge of trees required. Part 2 was a nice refresher on the classic Lowest Common Ancestor problem.
Day 7: This was when I noticed that I should probably modularize away my Intcode computer into its own class (eventually it evolved to being its own file). Great decision, by the way.
Day 10: Tough. Trigonometry galore. After a few hours of brainstorming, I had to resort to some tips from other people’s solutions. It was only after doodling a bunch and explaining it to other people that I fully understood what was going on. Much needed refresher on trig, though!
Day 11: Took me a bit to understand what I was actually supposed to do, but other than that it was a simple puzzle to exemplify the usage of the Intcode program as a Black Box. Instead, one could also reverse-engineer it using Excel.
Day 12: Another math-based puzzle, requiring some thinking to find the optimization trick for Part 2.
Day 13: So. Much. Fun! Definitely my favorite one of the year. Sadly, I missed Part 1’s leaderboard by mistyping the answer and being hit by the one-minute timeout. Always copy and paste, people!
Day 14: Many Factorio vibes. This one threw me off a lot by having to take into account the leftovers, but I eventually found my way through.
Day 16: Arguably another math puzzle? Maybe half math and half programming. My original code for Part 1 took around two minutes, so Part 2 would finish computing in a couple thousand years! Of course, I had other things to do in that meantime so I ended up getting the trick for Part 2 from the subreddit. Reverse partial sum it was!
Day 17: Leaderboard get once again! For Part 2, I winged it and figured it was faster to do it by hand than figuring out a compression algorithm on the fly. Apparently that was the better choice, as I got top 5! Of course, I later figured out the general solution for it.
Day 18: Pathfinding again, turned up to eleven. After hours of thinking and a couple tips later, my initial solution got me the right answer with a couple minutes of computing. Some really funoptimization rounds later, I brought my solution down to a reasonable runtime.
Day 22: The mother of all math puzzles for this year. Heavy usage of modular arithmetic and number theory. The only day in the event that social life did not allow me to finish it in under 24 hours of it being released. I had to go through so much theory and so many explanations and breakdowns to understand it all that I feel like I learned more with it than in my whole Discrete Mathematics course.
Day 24: Finally, a cellular automaton! I loved those last year, and at this point I was worried they wouldn’t be making an appearance this time around. It did take me a while to wrap my head around Part 2’s problem statement, but I guess that’s just the nature of recursiveness!
Day 25: I’ve waited so long for this! I spent more than a few minutes misunderstanding the “lighter” and “heavier” terms and swapping them in my mind, and as a result I kept looking for more items. After I finally got over that, I wrote a quick and dirty bruteforce, so the solution was reached half manually and half automated. Once again, of course I did code the general solution afterwards. Second favorite, mainly because of more fun rounds of runtime optimization.
]]>Synacor Challenge in Review2019-10-05T00:00:00+00:002019-10-05T00:00:00+00:00https://www.maiakanegae.com/synacor-challenge-in-review
I’ve had the Synacor Challenge bookmarked for a couple years now, having probably found it somewhere on the Advent of Code website or subreddit. Since I’m currently taking a Computer Architecture course and I’ve been busy for the last couple days building a MIPS Pipeline Simulator for it, I figured I would give it a shot.
It started just as a way to spend some free time I had on a friday morning, but as I started unraveling the challenge’s surprises, that quickly grew to a whole weekend spent solely on it. All my code is on my GitHub, as well as a full writeup, written as I was progressing through the challenge. You can also keep reading for more info and my spoiler-free comments on it.
According to the description on the challenge website, it was given by Synacor at some tech conferences in 2016, and although it doesn’t award anything anymore, it’s still available for whoever wants to try it.
In a nutshell, your task is to write a Virtual Machine capable of executing an included binary file, according to the complete architecture description provided, getting eight passwords along the way. As you progress, more and more puzzles are thrown your way, and you are totally free to solve them however you like with whatever programming language - for some of them, pen and paper even.
The challenge is not easy by any means. It feels tailored for the Computer Science undergrad curriculum, as each step of the way covers the content of a different course I’ve taken. With that said, if you feel somewhat confident in your general CS abilities (do note I didn’t say “programming” only), I highly recommend that you go in blind. But, be aware that there are some hard barriers, in which you either get the solution instantly or you don’t - and it’s going to take you some hours of research or days of shower thoughts. The moment it all clicks, though: it’s glorious.
Once again, remember to take a look at my writeup after you’ve given the challenge a try, and see where our solutions differ! But do be aware though, that it spoils the entire thing!